Compare commits
17 Commits
v0.150.2-p
...
context-se
| Author | SHA1 | Date | |
|---|---|---|---|
|
|
a533e622fa | ||
|
|
cd7073bd19 | ||
|
|
0c980cde74 | ||
|
|
9951df7709 | ||
|
|
936466e02c | ||
|
|
1eb1e16954 | ||
|
|
b67404323c | ||
|
|
c251a50e41 | ||
|
|
e482fcde5b | ||
|
|
f185269d03 | ||
|
|
1f0dc8b754 | ||
|
|
395a68133d | ||
|
|
77c08fade5 | ||
|
|
f7f7cd5bb9 | ||
|
|
6f5674691c | ||
|
|
8993a9f2ee | ||
|
|
9f66f12f7b |
8
Cargo.lock
generated
8
Cargo.lock
generated
@@ -9058,9 +9058,9 @@ dependencies = [
|
||||
|
||||
[[package]]
|
||||
name = "runtimelib"
|
||||
version = "0.14.0"
|
||||
version = "0.15.0"
|
||||
source = "registry+https://github.com/rust-lang/crates.io-index"
|
||||
checksum = "0c3d817764e3971867351e6103955b17d808f5330e9ef63aaaaab55bf8c664c1"
|
||||
checksum = "a7d76d28b882a7b889ebb04e79bc2b160b3061821ea596ff0f4a838fc7a76db0"
|
||||
dependencies = [
|
||||
"anyhow",
|
||||
"async-dispatcher",
|
||||
@@ -13839,7 +13839,7 @@ dependencies = [
|
||||
|
||||
[[package]]
|
||||
name = "zed"
|
||||
version = "0.150.2"
|
||||
version = "0.151.0"
|
||||
dependencies = [
|
||||
"activity_indicator",
|
||||
"anyhow",
|
||||
@@ -13988,7 +13988,7 @@ dependencies = [
|
||||
|
||||
[[package]]
|
||||
name = "zed_elixir"
|
||||
version = "0.0.7"
|
||||
version = "0.0.8"
|
||||
dependencies = [
|
||||
"zed_extension_api 0.0.6",
|
||||
]
|
||||
|
||||
@@ -383,7 +383,7 @@ rand = "0.8.5"
|
||||
regex = "1.5"
|
||||
repair_json = "0.1.0"
|
||||
rsa = "0.9.6"
|
||||
runtimelib = { version = "0.14", default-features = false, features = [
|
||||
runtimelib = { version = "0.15", default-features = false, features = [
|
||||
"async-dispatcher-runtime",
|
||||
] }
|
||||
rusqlite = { version = "0.29.0", features = ["blob", "array", "modern_sqlite"] }
|
||||
|
||||
@@ -836,7 +836,6 @@
|
||||
"language_servers": ["starpls", "!buck2-lsp", "..."]
|
||||
},
|
||||
"Svelte": {
|
||||
"language_servers": ["svelte-language-server", "..."],
|
||||
"prettier": {
|
||||
"allowed": true,
|
||||
"plugins": ["prettier-plugin-svelte"]
|
||||
@@ -860,7 +859,6 @@
|
||||
}
|
||||
},
|
||||
"Vue.js": {
|
||||
"language_servers": ["vue-language-server", "..."],
|
||||
"prettier": {
|
||||
"allowed": true
|
||||
}
|
||||
|
||||
26
compose.yml
26
compose.yml
@@ -33,5 +33,31 @@ services:
|
||||
volumes:
|
||||
- ./livekit.yaml:/livekit.yaml
|
||||
|
||||
postgrest_app:
|
||||
image: postgrest/postgrest
|
||||
container_name: postgrest_app
|
||||
ports:
|
||||
- 8081:8081
|
||||
environment:
|
||||
PGRST_DB_URI: postgres://postgres@postgres:5432/zed
|
||||
volumes:
|
||||
- ./crates/collab/postgrest_app.conf:/etc/postgrest.conf
|
||||
command: postgrest /etc/postgrest.conf
|
||||
depends_on:
|
||||
- postgres
|
||||
|
||||
postgrest_llm:
|
||||
image: postgrest/postgrest
|
||||
container_name: postgrest_llm
|
||||
ports:
|
||||
- 8082:8082
|
||||
environment:
|
||||
PGRST_DB_URI: postgres://postgres@postgres:5432/zed_llm
|
||||
volumes:
|
||||
- ./crates/collab/postgrest_llm.conf:/etc/postgrest.conf
|
||||
command: postgrest /etc/postgrest.conf
|
||||
depends_on:
|
||||
- postgres
|
||||
|
||||
volumes:
|
||||
postgres_data:
|
||||
|
||||
@@ -1,4 +1,4 @@
|
||||
db-uri = "postgres://postgres@localhost/zed_llm"
|
||||
server-port = 8082
|
||||
db-uri = "postgres://postgres@localhost/zed"
|
||||
server-port = 8081
|
||||
jwt-secret = "the-postgrest-jwt-secret-for-authorization"
|
||||
log-level = "info"
|
||||
|
||||
@@ -1,4 +1,4 @@
|
||||
db-uri = "postgres://postgres@localhost/zed"
|
||||
server-port = 8081
|
||||
db-uri = "postgres://postgres@localhost/zed_llm"
|
||||
server-port = 8082
|
||||
jwt-secret = "the-postgrest-jwt-secret-for-authorization"
|
||||
log-level = "info"
|
||||
|
||||
@@ -266,6 +266,22 @@ pub enum Direction {
|
||||
Next,
|
||||
}
|
||||
|
||||
#[derive(Debug, Copy, Clone, PartialEq, Eq)]
|
||||
pub enum Navigated {
|
||||
Yes,
|
||||
No,
|
||||
}
|
||||
|
||||
impl Navigated {
|
||||
pub fn from_bool(yes: bool) -> Navigated {
|
||||
if yes {
|
||||
Navigated::Yes
|
||||
} else {
|
||||
Navigated::No
|
||||
}
|
||||
}
|
||||
}
|
||||
|
||||
pub fn init_settings(cx: &mut AppContext) {
|
||||
EditorSettings::register(cx);
|
||||
}
|
||||
@@ -1561,6 +1577,7 @@ pub(crate) struct NavigationData {
|
||||
scroll_top_row: u32,
|
||||
}
|
||||
|
||||
#[derive(Debug, Clone, Copy, PartialEq, Eq)]
|
||||
enum GotoDefinitionKind {
|
||||
Symbol,
|
||||
Declaration,
|
||||
@@ -4843,7 +4860,7 @@ impl Editor {
|
||||
|
||||
let range = Anchor {
|
||||
buffer_id,
|
||||
excerpt_id: excerpt_id,
|
||||
excerpt_id,
|
||||
text_anchor: start,
|
||||
}..Anchor {
|
||||
buffer_id,
|
||||
@@ -9020,15 +9037,28 @@ impl Editor {
|
||||
&mut self,
|
||||
_: &GoToDefinition,
|
||||
cx: &mut ViewContext<Self>,
|
||||
) -> Task<Result<bool>> {
|
||||
self.go_to_definition_of_kind(GotoDefinitionKind::Symbol, false, cx)
|
||||
) -> Task<Result<Navigated>> {
|
||||
let definition = self.go_to_definition_of_kind(GotoDefinitionKind::Symbol, false, cx);
|
||||
let references = self.find_all_references(&FindAllReferences, cx);
|
||||
cx.background_executor().spawn(async move {
|
||||
if definition.await? == Navigated::Yes {
|
||||
return Ok(Navigated::Yes);
|
||||
}
|
||||
if let Some(references) = references {
|
||||
if references.await? == Navigated::Yes {
|
||||
return Ok(Navigated::Yes);
|
||||
}
|
||||
}
|
||||
|
||||
Ok(Navigated::No)
|
||||
})
|
||||
}
|
||||
|
||||
pub fn go_to_declaration(
|
||||
&mut self,
|
||||
_: &GoToDeclaration,
|
||||
cx: &mut ViewContext<Self>,
|
||||
) -> Task<Result<bool>> {
|
||||
) -> Task<Result<Navigated>> {
|
||||
self.go_to_definition_of_kind(GotoDefinitionKind::Declaration, false, cx)
|
||||
}
|
||||
|
||||
@@ -9036,7 +9066,7 @@ impl Editor {
|
||||
&mut self,
|
||||
_: &GoToDeclaration,
|
||||
cx: &mut ViewContext<Self>,
|
||||
) -> Task<Result<bool>> {
|
||||
) -> Task<Result<Navigated>> {
|
||||
self.go_to_definition_of_kind(GotoDefinitionKind::Declaration, true, cx)
|
||||
}
|
||||
|
||||
@@ -9044,7 +9074,7 @@ impl Editor {
|
||||
&mut self,
|
||||
_: &GoToImplementation,
|
||||
cx: &mut ViewContext<Self>,
|
||||
) -> Task<Result<bool>> {
|
||||
) -> Task<Result<Navigated>> {
|
||||
self.go_to_definition_of_kind(GotoDefinitionKind::Implementation, false, cx)
|
||||
}
|
||||
|
||||
@@ -9052,7 +9082,7 @@ impl Editor {
|
||||
&mut self,
|
||||
_: &GoToImplementationSplit,
|
||||
cx: &mut ViewContext<Self>,
|
||||
) -> Task<Result<bool>> {
|
||||
) -> Task<Result<Navigated>> {
|
||||
self.go_to_definition_of_kind(GotoDefinitionKind::Implementation, true, cx)
|
||||
}
|
||||
|
||||
@@ -9060,7 +9090,7 @@ impl Editor {
|
||||
&mut self,
|
||||
_: &GoToTypeDefinition,
|
||||
cx: &mut ViewContext<Self>,
|
||||
) -> Task<Result<bool>> {
|
||||
) -> Task<Result<Navigated>> {
|
||||
self.go_to_definition_of_kind(GotoDefinitionKind::Type, false, cx)
|
||||
}
|
||||
|
||||
@@ -9068,7 +9098,7 @@ impl Editor {
|
||||
&mut self,
|
||||
_: &GoToDefinitionSplit,
|
||||
cx: &mut ViewContext<Self>,
|
||||
) -> Task<Result<bool>> {
|
||||
) -> Task<Result<Navigated>> {
|
||||
self.go_to_definition_of_kind(GotoDefinitionKind::Symbol, true, cx)
|
||||
}
|
||||
|
||||
@@ -9076,7 +9106,7 @@ impl Editor {
|
||||
&mut self,
|
||||
_: &GoToTypeDefinitionSplit,
|
||||
cx: &mut ViewContext<Self>,
|
||||
) -> Task<Result<bool>> {
|
||||
) -> Task<Result<Navigated>> {
|
||||
self.go_to_definition_of_kind(GotoDefinitionKind::Type, true, cx)
|
||||
}
|
||||
|
||||
@@ -9085,16 +9115,16 @@ impl Editor {
|
||||
kind: GotoDefinitionKind,
|
||||
split: bool,
|
||||
cx: &mut ViewContext<Self>,
|
||||
) -> Task<Result<bool>> {
|
||||
) -> Task<Result<Navigated>> {
|
||||
let Some(workspace) = self.workspace() else {
|
||||
return Task::ready(Ok(false));
|
||||
return Task::ready(Ok(Navigated::No));
|
||||
};
|
||||
let buffer = self.buffer.read(cx);
|
||||
let head = self.selections.newest::<usize>(cx).head();
|
||||
let (buffer, head) = if let Some(text_anchor) = buffer.text_anchor_for_position(head, cx) {
|
||||
text_anchor
|
||||
} else {
|
||||
return Task::ready(Ok(false));
|
||||
return Task::ready(Ok(Navigated::No));
|
||||
};
|
||||
|
||||
let project = workspace.read(cx).project().clone();
|
||||
@@ -9153,7 +9183,7 @@ impl Editor {
|
||||
mut definitions: Vec<HoverLink>,
|
||||
split: bool,
|
||||
cx: &mut ViewContext<Editor>,
|
||||
) -> Task<Result<bool>> {
|
||||
) -> Task<Result<Navigated>> {
|
||||
// If there is one definition, just open it directly
|
||||
if definitions.len() == 1 {
|
||||
let definition = definitions.pop().unwrap();
|
||||
@@ -9169,77 +9199,61 @@ impl Editor {
|
||||
};
|
||||
cx.spawn(|editor, mut cx| async move {
|
||||
let target = target_task.await.context("target resolution task")?;
|
||||
if let Some(target) = target {
|
||||
editor.update(&mut cx, |editor, cx| {
|
||||
let Some(workspace) = editor.workspace() else {
|
||||
return false;
|
||||
};
|
||||
let pane = workspace.read(cx).active_pane().clone();
|
||||
let Some(target) = target else {
|
||||
return Ok(Navigated::No);
|
||||
};
|
||||
editor.update(&mut cx, |editor, cx| {
|
||||
let Some(workspace) = editor.workspace() else {
|
||||
return Navigated::No;
|
||||
};
|
||||
let pane = workspace.read(cx).active_pane().clone();
|
||||
|
||||
let range = target.range.to_offset(target.buffer.read(cx));
|
||||
let range = editor.range_for_match(&range);
|
||||
let range = target.range.to_offset(target.buffer.read(cx));
|
||||
let range = editor.range_for_match(&range);
|
||||
|
||||
/// If select range has more than one line, we
|
||||
/// just point the cursor to range.start.
|
||||
fn check_multiline_range(
|
||||
buffer: &Buffer,
|
||||
range: Range<usize>,
|
||||
) -> Range<usize> {
|
||||
if buffer.offset_to_point(range.start).row
|
||||
== buffer.offset_to_point(range.end).row
|
||||
{
|
||||
range
|
||||
} else {
|
||||
range.start..range.start
|
||||
}
|
||||
}
|
||||
if Some(&target.buffer) == editor.buffer.read(cx).as_singleton().as_ref() {
|
||||
let buffer = target.buffer.read(cx);
|
||||
let range = check_multiline_range(buffer, range);
|
||||
editor.change_selections(Some(Autoscroll::focused()), cx, |s| {
|
||||
s.select_ranges([range]);
|
||||
});
|
||||
} else {
|
||||
cx.window_context().defer(move |cx| {
|
||||
let target_editor: View<Self> =
|
||||
workspace.update(cx, |workspace, cx| {
|
||||
let pane = if split {
|
||||
workspace.adjacent_pane(cx)
|
||||
} else {
|
||||
workspace.active_pane().clone()
|
||||
};
|
||||
|
||||
workspace.open_project_item(
|
||||
pane,
|
||||
target.buffer.clone(),
|
||||
true,
|
||||
true,
|
||||
cx,
|
||||
)
|
||||
});
|
||||
target_editor.update(cx, |target_editor, cx| {
|
||||
// When selecting a definition in a different buffer, disable the nav history
|
||||
// to avoid creating a history entry at the previous cursor location.
|
||||
pane.update(cx, |pane, _| pane.disable_history());
|
||||
let buffer = target.buffer.read(cx);
|
||||
let range = check_multiline_range(buffer, range);
|
||||
target_editor.change_selections(
|
||||
Some(Autoscroll::focused()),
|
||||
workspace.open_project_item(
|
||||
pane,
|
||||
target.buffer.clone(),
|
||||
true,
|
||||
true,
|
||||
cx,
|
||||
|s| {
|
||||
s.select_ranges([range]);
|
||||
},
|
||||
);
|
||||
pane.update(cx, |pane, _| pane.enable_history());
|
||||
)
|
||||
});
|
||||
target_editor.update(cx, |target_editor, cx| {
|
||||
// When selecting a definition in a different buffer, disable the nav history
|
||||
// to avoid creating a history entry at the previous cursor location.
|
||||
pane.update(cx, |pane, _| pane.disable_history());
|
||||
let buffer = target.buffer.read(cx);
|
||||
let range = check_multiline_range(buffer, range);
|
||||
target_editor.change_selections(
|
||||
Some(Autoscroll::focused()),
|
||||
cx,
|
||||
|s| {
|
||||
s.select_ranges([range]);
|
||||
},
|
||||
);
|
||||
pane.update(cx, |pane, _| pane.enable_history());
|
||||
});
|
||||
}
|
||||
true
|
||||
})
|
||||
} else {
|
||||
Ok(false)
|
||||
}
|
||||
});
|
||||
}
|
||||
Navigated::Yes
|
||||
})
|
||||
})
|
||||
} else if !definitions.is_empty() {
|
||||
let replica_id = self.replica_id(cx);
|
||||
@@ -9289,7 +9303,7 @@ impl Editor {
|
||||
.context("location tasks")?;
|
||||
|
||||
let Some(workspace) = workspace else {
|
||||
return Ok(false);
|
||||
return Ok(Navigated::No);
|
||||
};
|
||||
let opened = workspace
|
||||
.update(&mut cx, |workspace, cx| {
|
||||
@@ -9299,10 +9313,10 @@ impl Editor {
|
||||
})
|
||||
.ok();
|
||||
|
||||
anyhow::Ok(opened.is_some())
|
||||
anyhow::Ok(Navigated::from_bool(opened.is_some()))
|
||||
})
|
||||
} else {
|
||||
Task::ready(Ok(false))
|
||||
Task::ready(Ok(Navigated::No))
|
||||
}
|
||||
}
|
||||
|
||||
@@ -9361,7 +9375,7 @@ impl Editor {
|
||||
&mut self,
|
||||
_: &FindAllReferences,
|
||||
cx: &mut ViewContext<Self>,
|
||||
) -> Option<Task<Result<()>>> {
|
||||
) -> Option<Task<Result<Navigated>>> {
|
||||
let multi_buffer = self.buffer.read(cx);
|
||||
let selection = self.selections.newest::<usize>(cx);
|
||||
let head = selection.head();
|
||||
@@ -9416,7 +9430,7 @@ impl Editor {
|
||||
|
||||
let locations = references.await?;
|
||||
if locations.is_empty() {
|
||||
return anyhow::Ok(());
|
||||
return anyhow::Ok(Navigated::No);
|
||||
}
|
||||
|
||||
workspace.update(&mut cx, |workspace, cx| {
|
||||
@@ -9436,6 +9450,7 @@ impl Editor {
|
||||
Self::open_locations_in_multibuffer(
|
||||
workspace, locations, replica_id, title, false, cx,
|
||||
);
|
||||
Navigated::Yes
|
||||
})
|
||||
}))
|
||||
}
|
||||
@@ -13277,3 +13292,13 @@ fn hunk_status(hunk: &DiffHunk<MultiBufferRow>) -> DiffHunkStatus {
|
||||
DiffHunkStatus::Modified
|
||||
}
|
||||
}
|
||||
|
||||
/// If select range has more than one line, we
|
||||
/// just point the cursor to range.start.
|
||||
fn check_multiline_range(buffer: &Buffer, range: Range<usize>) -> Range<usize> {
|
||||
if buffer.offset_to_point(range.start).row == buffer.offset_to_point(range.end).row {
|
||||
range
|
||||
} else {
|
||||
range.start..range.start
|
||||
}
|
||||
}
|
||||
|
||||
@@ -9090,43 +9090,6 @@ async fn go_to_prev_overlapping_diagnostic(
|
||||
"});
|
||||
}
|
||||
|
||||
#[gpui::test]
|
||||
async fn test_diagnostics_with_links(cx: &mut TestAppContext) {
|
||||
init_test(cx, |_| {});
|
||||
|
||||
let mut cx = EditorTestContext::new(cx).await;
|
||||
|
||||
cx.set_state(indoc! {"
|
||||
fn func(abˇc def: i32) -> u32 {
|
||||
}
|
||||
"});
|
||||
let project = cx.update_editor(|editor, _| editor.project.clone().unwrap());
|
||||
|
||||
cx.update(|cx| {
|
||||
project.update(cx, |project, cx| {
|
||||
project.update_diagnostics(
|
||||
LanguageServerId(0),
|
||||
lsp::PublishDiagnosticsParams {
|
||||
uri: lsp::Url::from_file_path("/root/file").unwrap(),
|
||||
version: None,
|
||||
diagnostics: vec![lsp::Diagnostic {
|
||||
range: lsp::Range::new(lsp::Position::new(0, 8), lsp::Position::new(0, 12)),
|
||||
severity: Some(lsp::DiagnosticSeverity::ERROR),
|
||||
message: "we've had problems with <https://link.one>, and <https://link.two> is broken".to_string(),
|
||||
..Default::default()
|
||||
}],
|
||||
},
|
||||
&[],
|
||||
cx,
|
||||
)
|
||||
})
|
||||
}).unwrap();
|
||||
cx.run_until_parked();
|
||||
cx.update_editor(|editor, cx| hover_popover::hover(editor, &Default::default(), cx));
|
||||
cx.run_until_parked();
|
||||
cx.update_editor(|editor, _| assert!(editor.hover_state.diagnostic_popover.is_some()))
|
||||
}
|
||||
|
||||
#[gpui::test]
|
||||
async fn go_to_hunk(executor: BackgroundExecutor, cx: &mut gpui::TestAppContext) {
|
||||
init_test(cx, |_| {});
|
||||
@@ -13258,6 +13221,127 @@ let foo = 15;"#,
|
||||
});
|
||||
}
|
||||
|
||||
#[gpui::test]
|
||||
async fn test_goto_definition_with_find_all_references_fallback(cx: &mut gpui::TestAppContext) {
|
||||
init_test(cx, |_| {});
|
||||
let mut cx = EditorLspTestContext::new_rust(
|
||||
lsp::ServerCapabilities {
|
||||
definition_provider: Some(lsp::OneOf::Left(true)),
|
||||
references_provider: Some(lsp::OneOf::Left(true)),
|
||||
..lsp::ServerCapabilities::default()
|
||||
},
|
||||
cx,
|
||||
)
|
||||
.await;
|
||||
|
||||
let set_up_lsp_handlers = |empty_go_to_definition: bool, cx: &mut EditorLspTestContext| {
|
||||
let go_to_definition = cx.lsp.handle_request::<lsp::request::GotoDefinition, _, _>(
|
||||
move |params, _| async move {
|
||||
if empty_go_to_definition {
|
||||
Ok(None)
|
||||
} else {
|
||||
Ok(Some(lsp::GotoDefinitionResponse::Scalar(lsp::Location {
|
||||
uri: params.text_document_position_params.text_document.uri,
|
||||
range: lsp::Range::new(lsp::Position::new(4, 3), lsp::Position::new(4, 6)),
|
||||
})))
|
||||
}
|
||||
},
|
||||
);
|
||||
let references =
|
||||
cx.lsp
|
||||
.handle_request::<lsp::request::References, _, _>(move |params, _| async move {
|
||||
Ok(Some(vec![lsp::Location {
|
||||
uri: params.text_document_position.text_document.uri,
|
||||
range: lsp::Range::new(lsp::Position::new(0, 8), lsp::Position::new(0, 11)),
|
||||
}]))
|
||||
});
|
||||
(go_to_definition, references)
|
||||
};
|
||||
|
||||
cx.set_state(
|
||||
&r#"fn one() {
|
||||
let mut a = ˇtwo();
|
||||
}
|
||||
|
||||
fn two() {}"#
|
||||
.unindent(),
|
||||
);
|
||||
set_up_lsp_handlers(false, &mut cx);
|
||||
let navigated = cx
|
||||
.update_editor(|editor, cx| editor.go_to_definition(&GoToDefinition, cx))
|
||||
.await
|
||||
.expect("Failed to navigate to definition");
|
||||
assert_eq!(
|
||||
navigated,
|
||||
Navigated::Yes,
|
||||
"Should have navigated to definition from the GetDefinition response"
|
||||
);
|
||||
cx.assert_editor_state(
|
||||
&r#"fn one() {
|
||||
let mut a = two();
|
||||
}
|
||||
|
||||
fn «twoˇ»() {}"#
|
||||
.unindent(),
|
||||
);
|
||||
|
||||
let editors = cx.update_workspace(|workspace, cx| {
|
||||
workspace.items_of_type::<Editor>(cx).collect::<Vec<_>>()
|
||||
});
|
||||
cx.update_editor(|_, test_editor_cx| {
|
||||
assert_eq!(
|
||||
editors.len(),
|
||||
1,
|
||||
"Initially, only one, test, editor should be open in the workspace"
|
||||
);
|
||||
assert_eq!(
|
||||
test_editor_cx.view(),
|
||||
editors.last().expect("Asserted len is 1")
|
||||
);
|
||||
});
|
||||
|
||||
set_up_lsp_handlers(true, &mut cx);
|
||||
let navigated = cx
|
||||
.update_editor(|editor, cx| editor.go_to_definition(&GoToDefinition, cx))
|
||||
.await
|
||||
.expect("Failed to navigate to lookup references");
|
||||
assert_eq!(
|
||||
navigated,
|
||||
Navigated::Yes,
|
||||
"Should have navigated to references as a fallback after empty GoToDefinition response"
|
||||
);
|
||||
// We should not change the selections in the existing file,
|
||||
// if opening another milti buffer with the references
|
||||
cx.assert_editor_state(
|
||||
&r#"fn one() {
|
||||
let mut a = two();
|
||||
}
|
||||
|
||||
fn «twoˇ»() {}"#
|
||||
.unindent(),
|
||||
);
|
||||
let editors = cx.update_workspace(|workspace, cx| {
|
||||
workspace.items_of_type::<Editor>(cx).collect::<Vec<_>>()
|
||||
});
|
||||
cx.update_editor(|_, test_editor_cx| {
|
||||
assert_eq!(
|
||||
editors.len(),
|
||||
2,
|
||||
"After falling back to references search, we open a new editor with the results"
|
||||
);
|
||||
let references_fallback_text = editors
|
||||
.into_iter()
|
||||
.find(|new_editor| new_editor != test_editor_cx.view())
|
||||
.expect("Should have one non-test editor now")
|
||||
.read(test_editor_cx)
|
||||
.text(test_editor_cx);
|
||||
assert_eq!(
|
||||
references_fallback_text, "fn one() {\n let mut a = two();\n}",
|
||||
"Should use the range from the references response and not the GoToDefinition one"
|
||||
);
|
||||
});
|
||||
}
|
||||
|
||||
fn empty_range(row: usize, column: usize) -> Range<DisplayPoint> {
|
||||
let point = DisplayPoint::new(DisplayRow(row as u32), column as u32);
|
||||
point..point
|
||||
|
||||
@@ -2,7 +2,7 @@ use crate::{
|
||||
hover_popover::{self, InlayHover},
|
||||
scroll::ScrollAmount,
|
||||
Anchor, Editor, EditorSnapshot, FindAllReferences, GoToDefinition, GoToTypeDefinition, InlayId,
|
||||
PointForPosition, SelectPhase,
|
||||
Navigated, PointForPosition, SelectPhase,
|
||||
};
|
||||
use gpui::{px, AppContext, AsyncWindowContext, Model, Modifiers, Task, ViewContext};
|
||||
use language::{Bias, ToOffset};
|
||||
@@ -157,10 +157,10 @@ impl Editor {
|
||||
) {
|
||||
let reveal_task = self.cmd_click_reveal_task(point, modifiers, cx);
|
||||
cx.spawn(|editor, mut cx| async move {
|
||||
let definition_revealed = reveal_task.await.log_err().unwrap_or(false);
|
||||
let definition_revealed = reveal_task.await.log_err().unwrap_or(Navigated::No);
|
||||
let find_references = editor
|
||||
.update(&mut cx, |editor, cx| {
|
||||
if definition_revealed {
|
||||
if definition_revealed == Navigated::Yes {
|
||||
return None;
|
||||
}
|
||||
editor.find_all_references(&FindAllReferences, cx)
|
||||
@@ -194,7 +194,7 @@ impl Editor {
|
||||
point: PointForPosition,
|
||||
modifiers: Modifiers,
|
||||
cx: &mut ViewContext<Editor>,
|
||||
) -> Task<anyhow::Result<bool>> {
|
||||
) -> Task<anyhow::Result<Navigated>> {
|
||||
if let Some(hovered_link_state) = self.hovered_link_state.take() {
|
||||
self.hide_hovered_link(cx);
|
||||
if !hovered_link_state.links.is_empty() {
|
||||
@@ -211,7 +211,7 @@ impl Editor {
|
||||
.read(cx)
|
||||
.text_anchor_for_position(current_position, cx)
|
||||
else {
|
||||
return Task::ready(Ok(false));
|
||||
return Task::ready(Ok(Navigated::No));
|
||||
};
|
||||
let links = hovered_link_state
|
||||
.links
|
||||
@@ -247,7 +247,7 @@ impl Editor {
|
||||
self.go_to_definition(&GoToDefinition, cx)
|
||||
}
|
||||
} else {
|
||||
Task::ready(Ok(false))
|
||||
Task::ready(Ok(Navigated::No))
|
||||
}
|
||||
}
|
||||
}
|
||||
|
||||
@@ -159,24 +159,6 @@ pub struct CachedLspAdapter {
|
||||
cached_binary: futures::lock::Mutex<Option<LanguageServerBinary>>,
|
||||
}
|
||||
|
||||
impl Debug for CachedLspAdapter {
|
||||
fn fmt(&self, f: &mut std::fmt::Formatter<'_>) -> std::fmt::Result {
|
||||
f.debug_struct("CachedLspAdapter")
|
||||
.field("name", &self.name)
|
||||
.field(
|
||||
"disk_based_diagnostic_sources",
|
||||
&self.disk_based_diagnostic_sources,
|
||||
)
|
||||
.field(
|
||||
"disk_based_diagnostics_progress_token",
|
||||
&self.disk_based_diagnostics_progress_token,
|
||||
)
|
||||
.field("language_ids", &self.language_ids)
|
||||
.field("reinstall_attempt_count", &self.reinstall_attempt_count)
|
||||
.finish_non_exhaustive()
|
||||
}
|
||||
}
|
||||
|
||||
impl CachedLspAdapter {
|
||||
pub fn new(adapter: Arc<dyn LspAdapter>) -> Arc<Self> {
|
||||
let name = adapter.name();
|
||||
|
||||
@@ -444,21 +444,6 @@ impl LanguageModel for CloudLanguageModel {
|
||||
self.model.max_token_count()
|
||||
}
|
||||
|
||||
fn cache_configuration(&self) -> Option<LanguageModelCacheConfiguration> {
|
||||
match &self.model {
|
||||
CloudModel::Anthropic(model) => {
|
||||
model
|
||||
.cache_configuration()
|
||||
.map(|cache| LanguageModelCacheConfiguration {
|
||||
max_cache_anchors: cache.max_cache_anchors,
|
||||
should_speculate: cache.should_speculate,
|
||||
min_total_token: cache.min_total_token,
|
||||
})
|
||||
}
|
||||
CloudModel::OpenAi(_) | CloudModel::Google(_) | CloudModel::Zed(_) => None,
|
||||
}
|
||||
}
|
||||
|
||||
fn count_tokens(
|
||||
&self,
|
||||
request: LanguageModelRequest,
|
||||
|
||||
@@ -96,8 +96,8 @@ pub fn parse_links_only(text: &str) -> Vec<(Range<usize>, MarkdownEvent)> {
|
||||
start: 0,
|
||||
end: text.len(),
|
||||
};
|
||||
for link in finder.links(&text) {
|
||||
let link_range = link.start()..link.end();
|
||||
for link in finder.links(&text[text_range.clone()]) {
|
||||
let link_range = text_range.start + link.start()..text_range.start + link.end();
|
||||
|
||||
if link_range.start > text_range.start {
|
||||
events.push((text_range.start..link_range.start, MarkdownEvent::Text));
|
||||
@@ -118,9 +118,7 @@ pub fn parse_links_only(text: &str) -> Vec<(Range<usize>, MarkdownEvent)> {
|
||||
text_range.start = link_range.end;
|
||||
}
|
||||
|
||||
if text_range.end > text_range.start {
|
||||
events.push((text_range, MarkdownEvent::Text));
|
||||
}
|
||||
events.push((text_range, MarkdownEvent::Text));
|
||||
|
||||
events
|
||||
}
|
||||
|
||||
@@ -232,6 +232,7 @@ pub struct Project {
|
||||
cached_shell_environments: HashMap<WorktreeId, HashMap<String, String>>,
|
||||
}
|
||||
|
||||
#[derive(Debug)]
|
||||
pub enum LanguageServerToQuery {
|
||||
Primary,
|
||||
Other(LanguageServerId),
|
||||
|
||||
@@ -261,7 +261,7 @@ impl RunningKernel {
|
||||
messages_rx.push(control_reply_rx);
|
||||
messages_rx.push(shell_reply_rx);
|
||||
|
||||
let _iopub_task = cx.background_executor().spawn({
|
||||
let iopub_task = cx.background_executor().spawn({
|
||||
async move {
|
||||
while let Ok(message) = iopub_socket.read().await {
|
||||
iopub.send(message).await?;
|
||||
@@ -274,7 +274,7 @@ impl RunningKernel {
|
||||
futures::channel::mpsc::channel(100);
|
||||
let (mut shell_request_tx, mut shell_request_rx) = futures::channel::mpsc::channel(100);
|
||||
|
||||
let _routing_task = cx.background_executor().spawn({
|
||||
let routing_task = cx.background_executor().spawn({
|
||||
async move {
|
||||
while let Some(message) = request_rx.next().await {
|
||||
match message.content {
|
||||
@@ -292,7 +292,7 @@ impl RunningKernel {
|
||||
}
|
||||
});
|
||||
|
||||
let _shell_task = cx.background_executor().spawn({
|
||||
let shell_task = cx.background_executor().spawn({
|
||||
async move {
|
||||
while let Some(message) = shell_request_rx.next().await {
|
||||
shell_socket.send(message).await.ok();
|
||||
@@ -303,7 +303,7 @@ impl RunningKernel {
|
||||
}
|
||||
});
|
||||
|
||||
let _control_task = cx.background_executor().spawn({
|
||||
let control_task = cx.background_executor().spawn({
|
||||
async move {
|
||||
while let Some(message) = control_request_rx.next().await {
|
||||
control_socket.send(message).await.ok();
|
||||
@@ -319,10 +319,10 @@ impl RunningKernel {
|
||||
process,
|
||||
request_tx,
|
||||
working_directory,
|
||||
_shell_task,
|
||||
_iopub_task,
|
||||
_control_task,
|
||||
_routing_task,
|
||||
_shell_task: shell_task,
|
||||
_iopub_task: iopub_task,
|
||||
_control_task: control_task,
|
||||
_routing_task: routing_task,
|
||||
connection_path,
|
||||
execution_state: ExecutionState::Busy,
|
||||
kernel_info: None,
|
||||
|
||||
@@ -3,6 +3,7 @@ use crate::{
|
||||
ClosePosition, Item, ItemHandle, ItemSettings, PreviewTabsSettings, TabContentParams,
|
||||
WeakItemHandle,
|
||||
},
|
||||
notifications::NotifyResultExt,
|
||||
toolbar::Toolbar,
|
||||
workspace_settings::{AutosaveSetting, TabBarSettings, WorkspaceSettings},
|
||||
CloseWindow, CopyPath, CopyRelativePath, NewFile, NewTerminal, OpenInTerminal, OpenTerminal,
|
||||
@@ -2109,13 +2110,32 @@ impl Pane {
|
||||
.read(cx)
|
||||
.path_for_entry(project_entry_id, cx)
|
||||
{
|
||||
if let Some(split_direction) = split_direction {
|
||||
to_pane = workspace.split_pane(to_pane, split_direction, cx);
|
||||
}
|
||||
workspace
|
||||
.open_path(path, Some(to_pane.downgrade()), true, cx)
|
||||
.detach_and_log_err(cx);
|
||||
}
|
||||
let load_path_task = workspace.load_path(path, cx);
|
||||
cx.spawn(|workspace, mut cx| async move {
|
||||
if let Some((project_entry_id, build_item)) =
|
||||
load_path_task.await.notify_async_err(&mut cx)
|
||||
{
|
||||
workspace
|
||||
.update(&mut cx, |workspace, cx| {
|
||||
if let Some(split_direction) = split_direction {
|
||||
to_pane =
|
||||
workspace.split_pane(to_pane, split_direction, cx);
|
||||
}
|
||||
to_pane.update(cx, |pane, cx| {
|
||||
pane.open_item(
|
||||
project_entry_id,
|
||||
true,
|
||||
false,
|
||||
cx,
|
||||
build_item,
|
||||
)
|
||||
})
|
||||
})
|
||||
.log_err();
|
||||
}
|
||||
})
|
||||
.detach();
|
||||
};
|
||||
});
|
||||
})
|
||||
.log_err();
|
||||
@@ -2186,7 +2206,14 @@ impl Pane {
|
||||
})
|
||||
.ok()
|
||||
{
|
||||
let _opened_items: Vec<_> = open_task.await;
|
||||
let opened_items: Vec<_> = open_task.await;
|
||||
_ = workspace.update(&mut cx, |workspace, cx| {
|
||||
for item in opened_items.into_iter().flatten() {
|
||||
if let Err(e) = item {
|
||||
workspace.show_error(&e, cx);
|
||||
}
|
||||
}
|
||||
});
|
||||
}
|
||||
})
|
||||
.detach();
|
||||
|
||||
@@ -2,7 +2,7 @@
|
||||
description = "The fast, collaborative code editor."
|
||||
edition = "2021"
|
||||
name = "zed"
|
||||
version = "0.150.2"
|
||||
version = "0.151.0"
|
||||
publish = false
|
||||
license = "GPL-3.0-or-later"
|
||||
authors = ["Zed Team <hi@zed.dev>"]
|
||||
|
||||
@@ -1 +1 @@
|
||||
preview
|
||||
dev
|
||||
@@ -9,8 +9,8 @@ site-url = "/docs/"
|
||||
[output.html]
|
||||
no-section-label = true
|
||||
preferred-dark-theme = "light"
|
||||
additional-css = ["theme/page-toc.css"]
|
||||
additional-js = ["theme/page-toc.js"]
|
||||
additional-css = ["theme/page-toc.css", "theme/plugins.css"]
|
||||
additional-js = ["theme/page-toc.js", "theme/plugins.js"]
|
||||
|
||||
[output.html.print]
|
||||
enable = false
|
||||
|
||||
@@ -22,7 +22,6 @@
|
||||
# Using Zed
|
||||
|
||||
- [Multibuffers](./multibuffers.md)
|
||||
- [Assistant](./assistant.md)
|
||||
- [Code Completions](./completions.md)
|
||||
- [Channels](./channels.md)
|
||||
- [Collaboration](./collaboration.md)
|
||||
@@ -31,6 +30,18 @@
|
||||
- [Remote Development](./remote-development.md)
|
||||
- [REPL](./repl.md)
|
||||
|
||||
# Assistant
|
||||
|
||||
- [Assistant](./assistant/assistant.md)
|
||||
- [Configuration](./assistant/configuration.md)
|
||||
- [Assistant Panel](./assistant/assistant-panel.md)
|
||||
- [Contexts](./assistant/contexts.md)
|
||||
- [Inline Assistant](./assistant/inline-assistant.md)
|
||||
- [Commands](./assistant/commands.md)
|
||||
- [Prompts](./assistant/prompting.md)
|
||||
- [Context Servers](./assistant/context-servers.md)
|
||||
- [Model Context Protocol](./assistant/model-context-protocol.md)
|
||||
|
||||
# Extensions
|
||||
|
||||
- [Overview](./extensions.md)
|
||||
|
||||
@@ -1,291 +0,0 @@
|
||||
# Assistant
|
||||
|
||||
## Assistant Panel
|
||||
|
||||
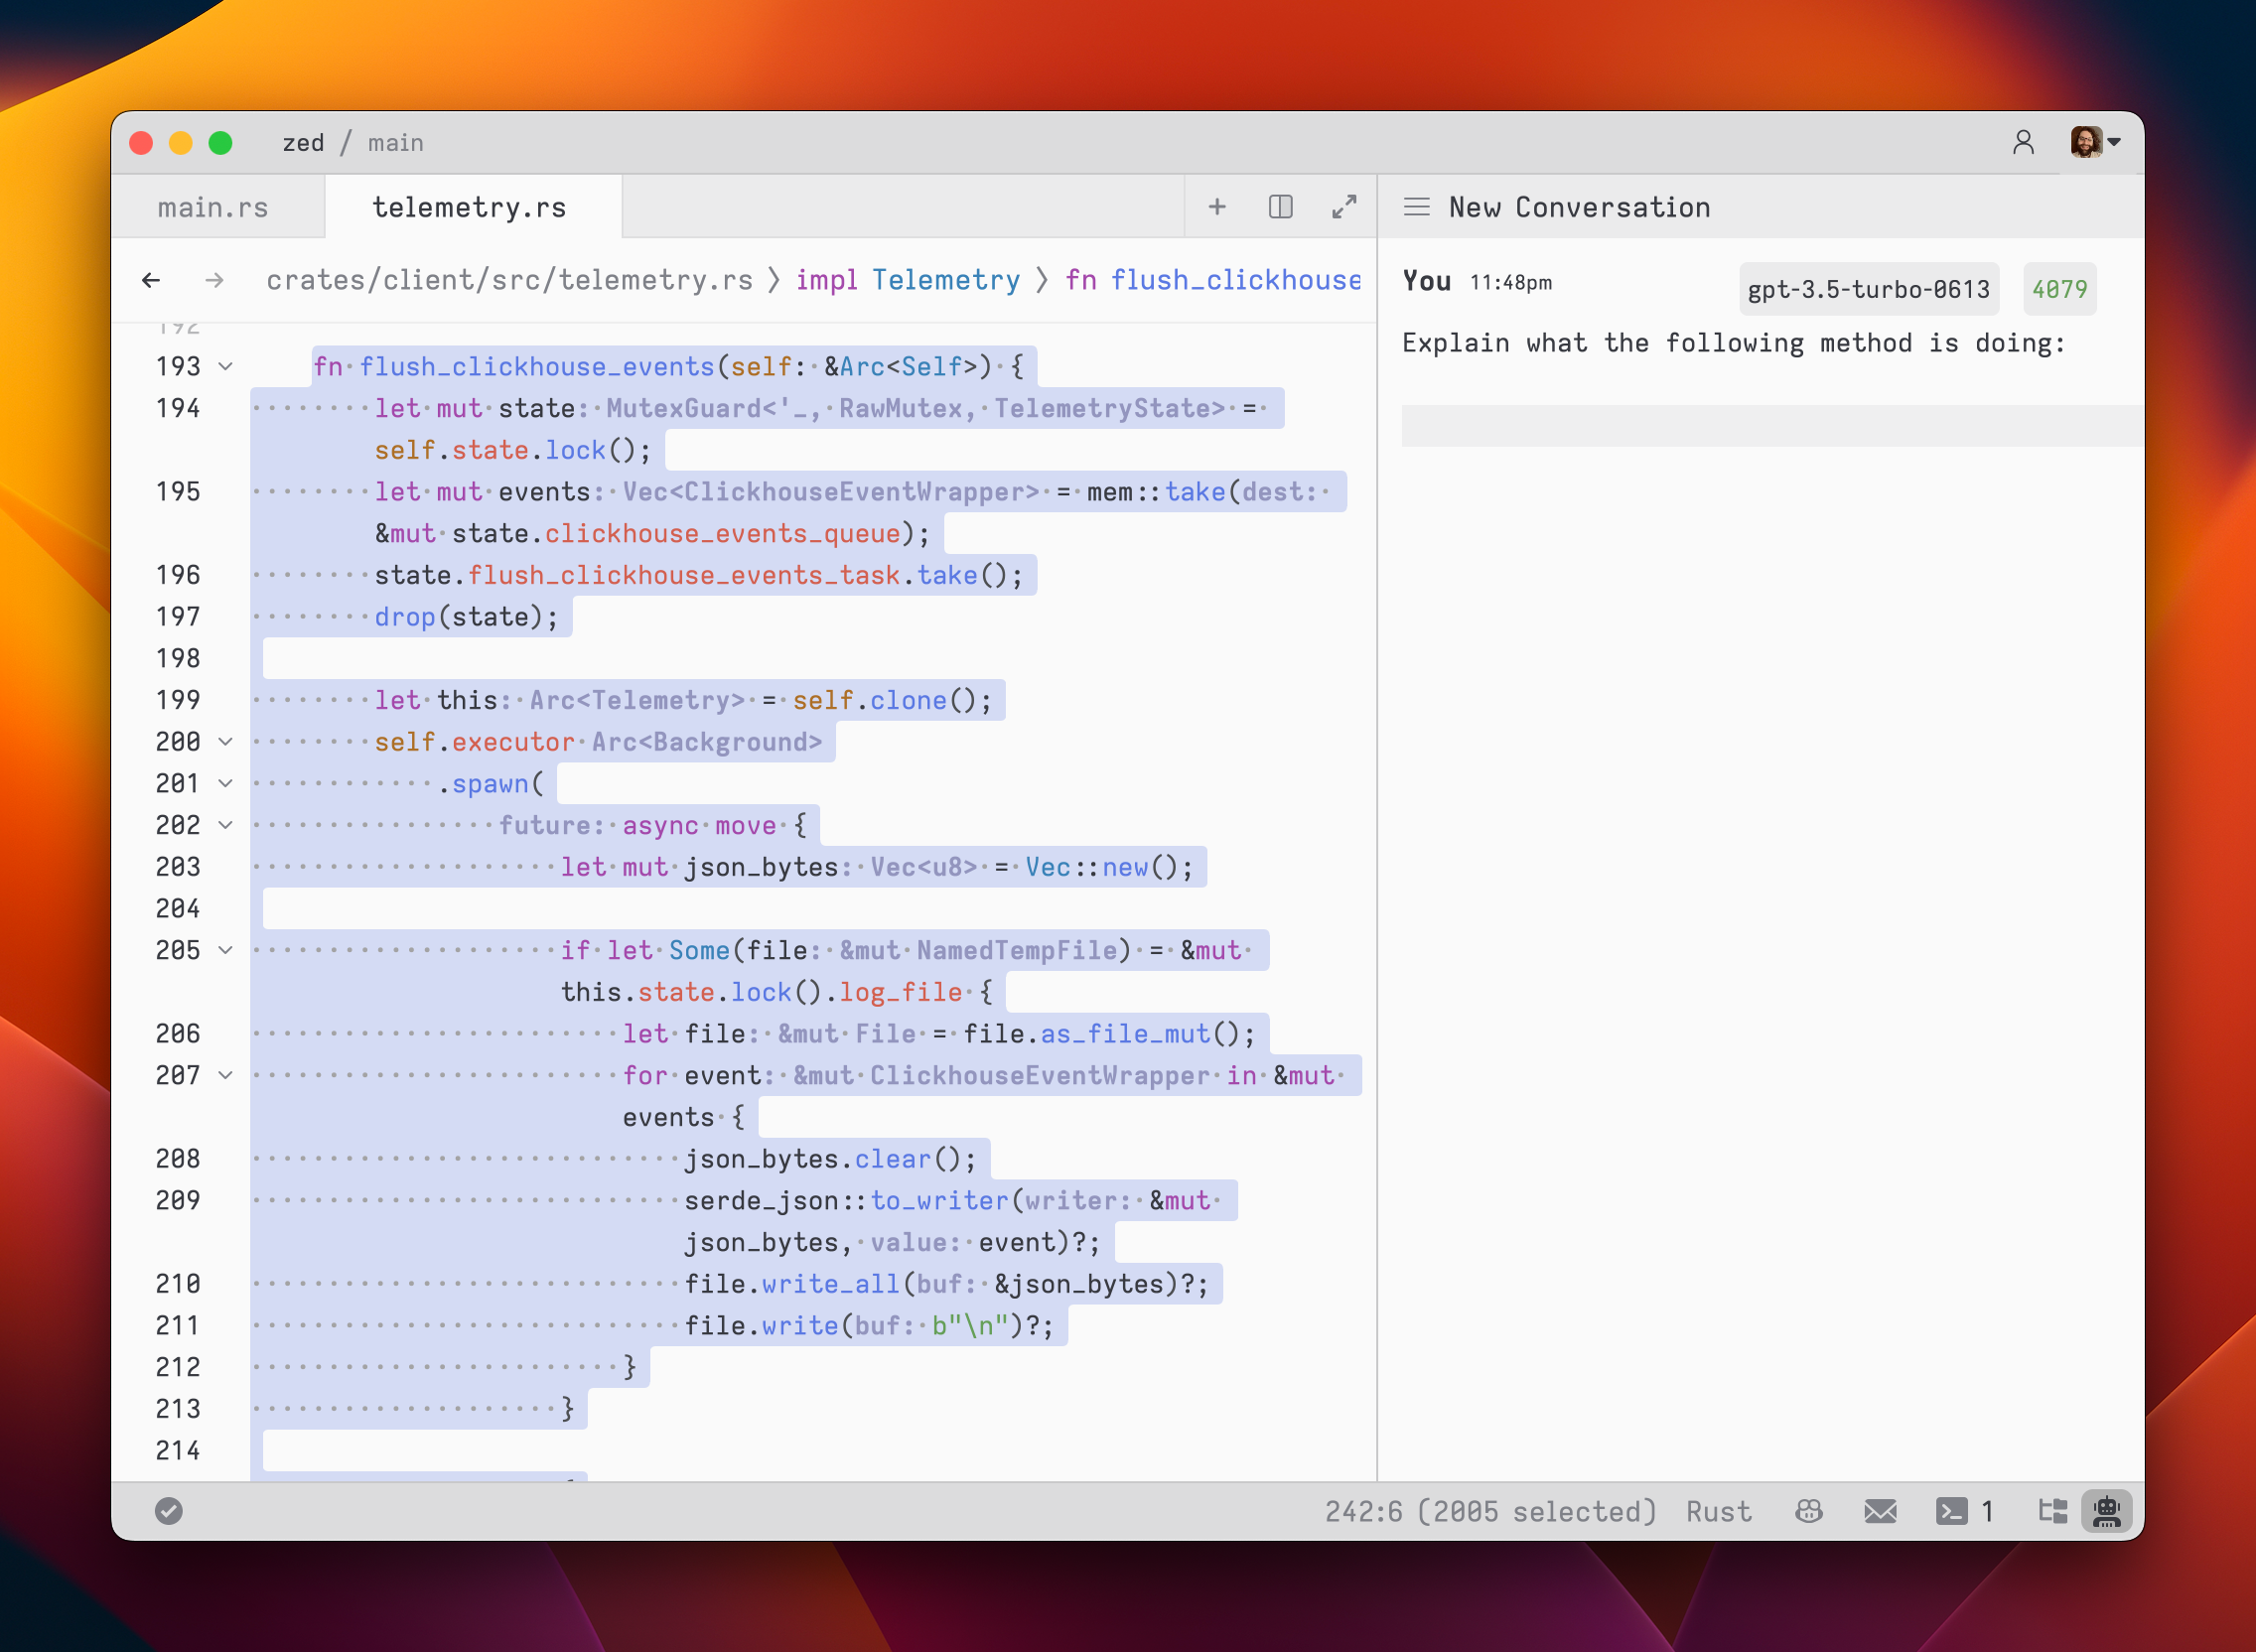
The assistant panel provides you with a way to interact with large language models. The assistant is useful for various tasks, such as generating code, asking questions about existing code, and even writing plaintext, such as emails and documentation. To open the assistant panel, toggle the right dock by using the `workspace: toggle right dock` action in the command palette or by using the `cmd-r` (Mac) or `ctrl-alt-b` (Linux) shortcut.
|
||||
|
||||
> **Note**: A custom [key binding](./key-bindings.md) can be set to toggle the right dock.
|
||||
|
||||
Once you have configured a provider, you can interact with the provider's language models in a context editor.
|
||||
|
||||
To create a new context editor, use the menu in the top right of the assistant panel and select the `New Context` option.
|
||||
|
||||
In the context editor, select a model from one of the configured providers, type a message in the `You` block, and submit with `cmd-enter` (or `ctrl-enter` on Linux).
|
||||
|
||||
## Setup
|
||||
|
||||
- [OpenAI API Setup Instructions](#openai)
|
||||
- [OpenAI API Custom Endpoint](#openai-custom-endpoint)
|
||||
- [Ollama Setup Instructions](#ollama)
|
||||
- [Anthropic API Setup Instructions](#anthropic)
|
||||
- [Google Gemini API Setup Instructions](#google-gemini)
|
||||
- [GitHub Copilot Chat](#github-copilot)
|
||||
|
||||
### Having a Conversation
|
||||
|
||||
The assistant editor in Zed functions similarly to any other editor. You can use custom key bindings and work with multiple cursors, allowing for seamless transitions between coding and engaging in discussions with the language models. However, the assistant editor differs with the inclusion of message blocks. These blocks serve as containers for text that correspond to different roles within the conversation. These roles include:
|
||||
|
||||
- `You`
|
||||
- `Assistant`
|
||||
- `System`
|
||||
|
||||
To begin, select a model and type a message in a `You` block.
|
||||
|
||||
|
||||
|
||||
As you type, the remaining tokens count for the selected model is updated.
|
||||
|
||||
Inserting text from an editor is as simple as highlighting the text and running `cmd->` (`assistant: quote selection`); Zed will wrap it in a fenced code block if it is code.
|
||||
|
||||
|
||||
|
||||
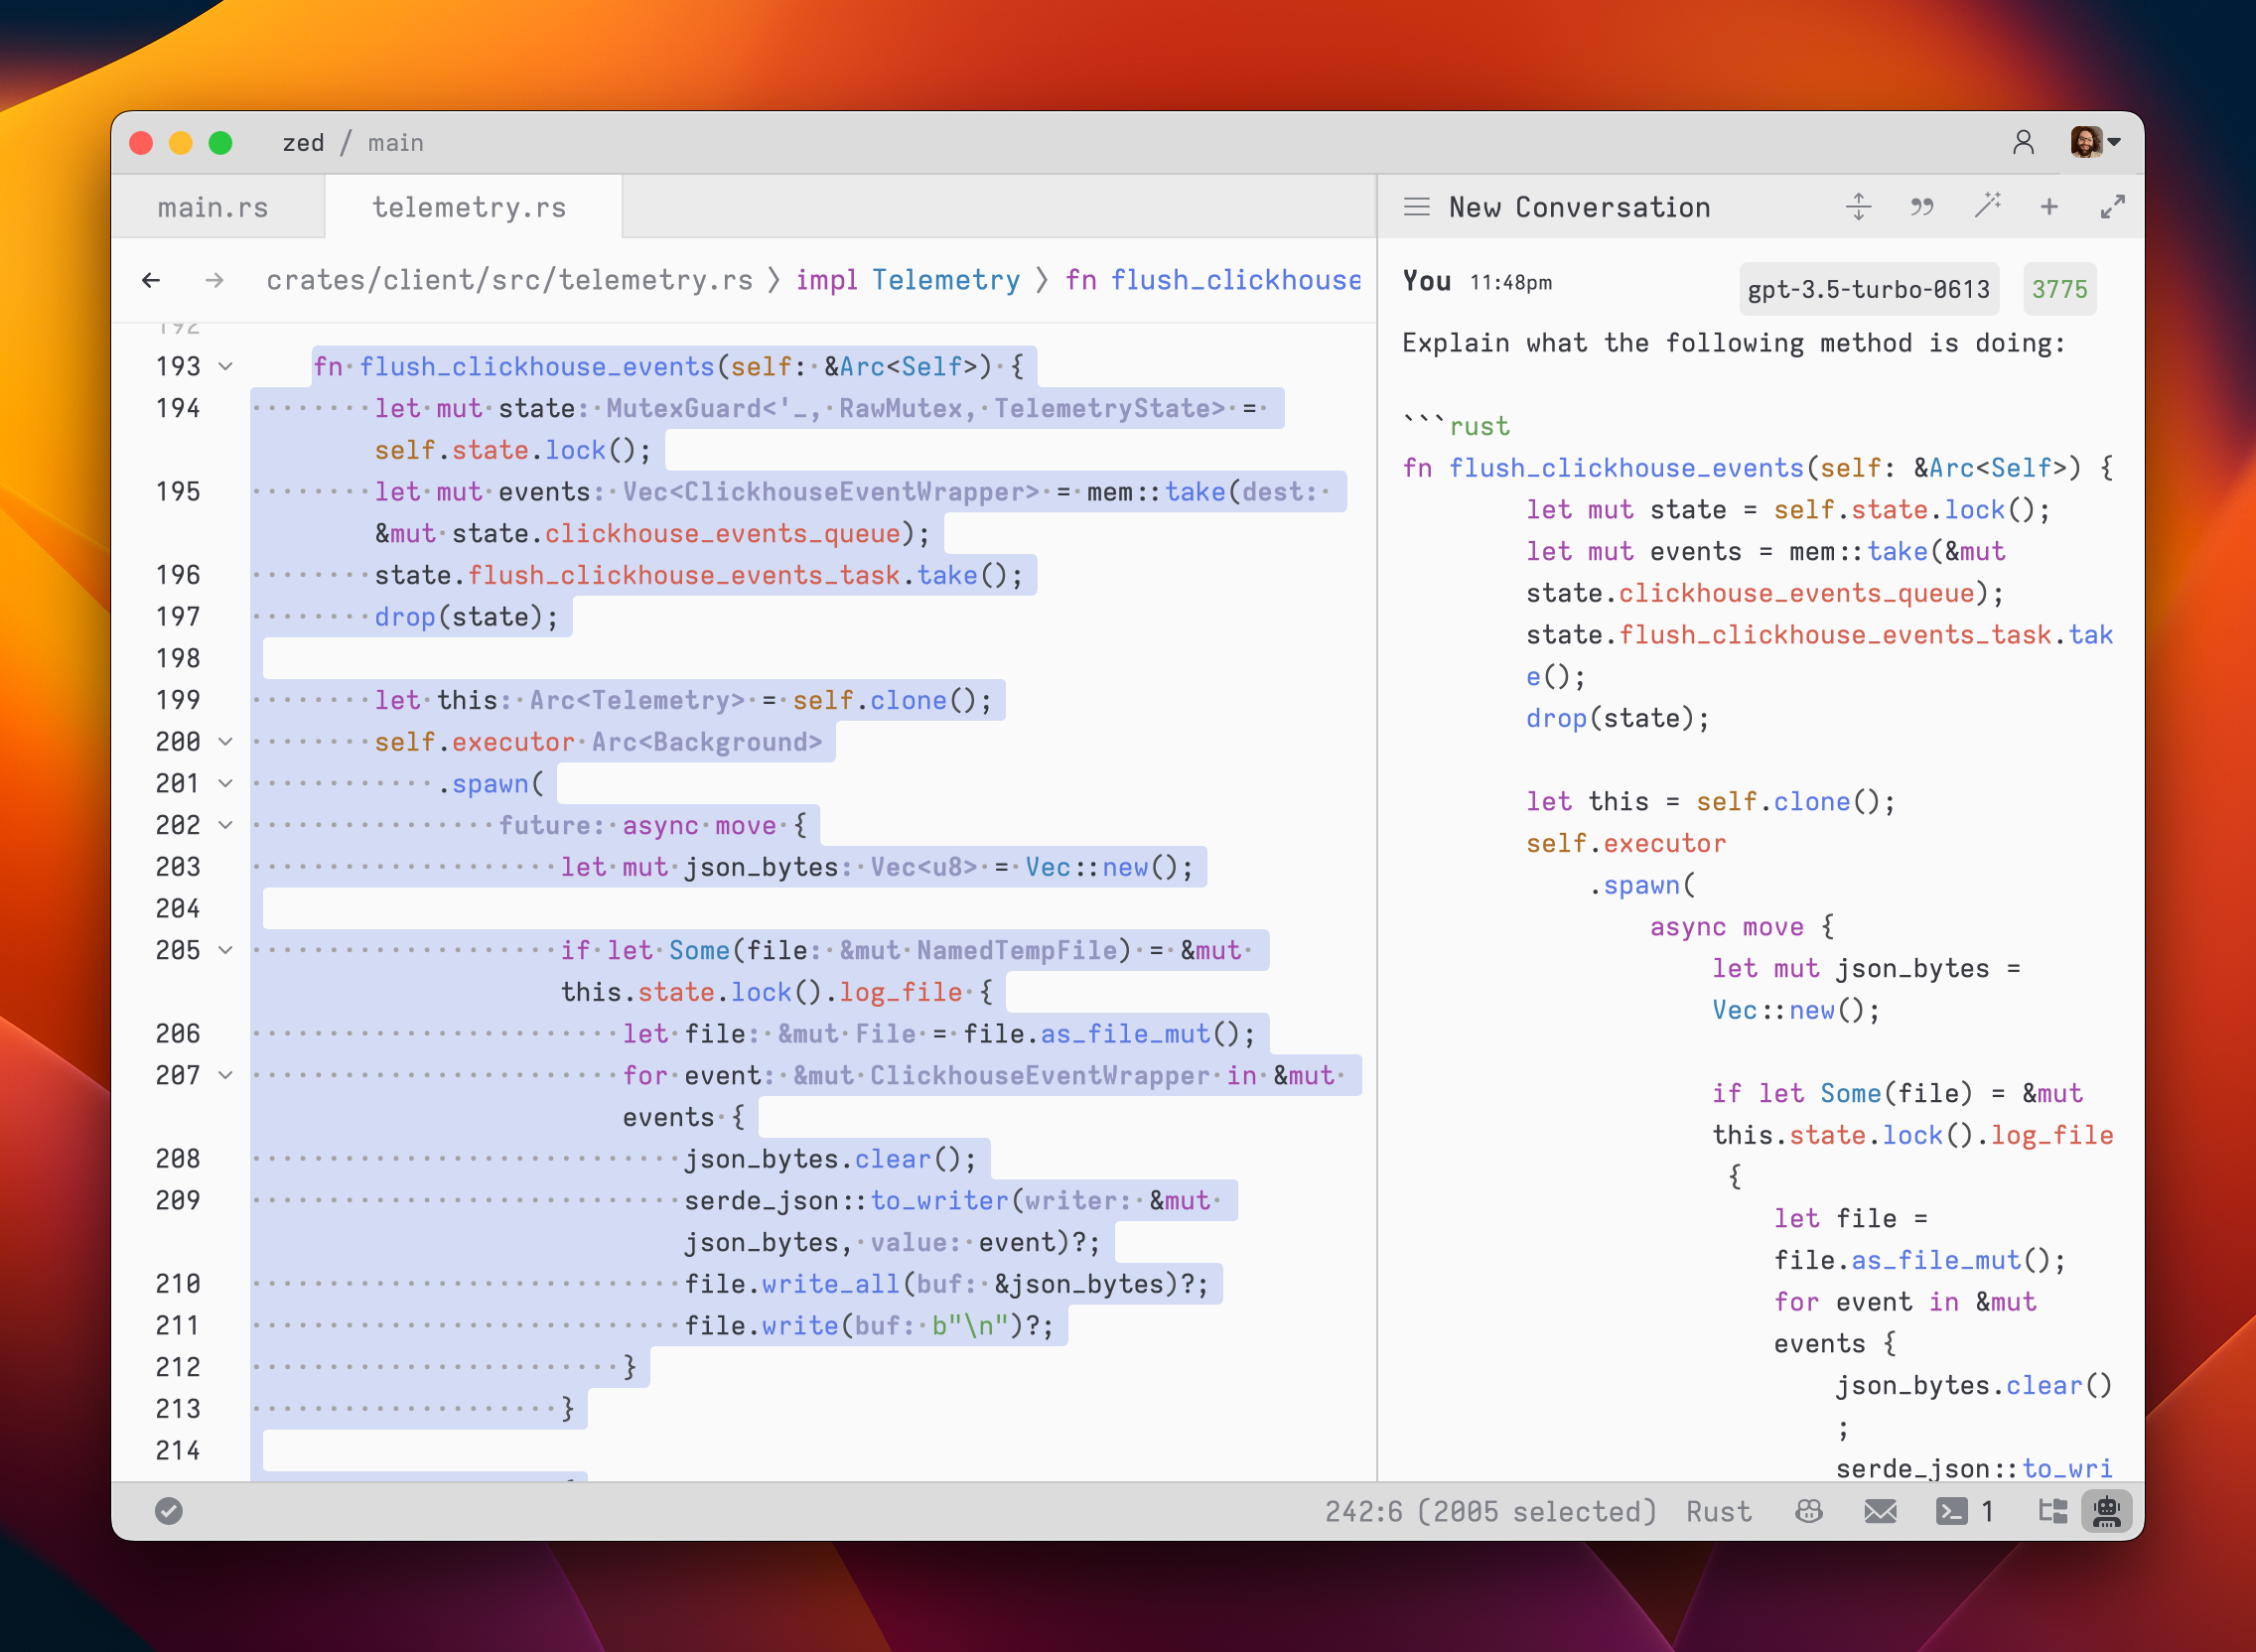
To submit a message, use `cmd-enter` (`assistant: assist`). Unlike typical chat applications where pressing `enter` would submit the message, in the assistant editor, our goal was to make it feel as close to a regular editor as possible. So, pressing `enter` simply inserts a new line.
|
||||
|
||||
After submitting a message, the assistant's response will be streamed below, in an `Assistant` message block.
|
||||
|
||||

|
||||
|
||||
The stream can be canceled at any point with `escape`. This is useful if you realize early on that the response is not what you were looking for.
|
||||
|
||||
If you want to start a new conversation at any time, you can hit `cmd-n` or use the `New Context` menu option in the hamburger menu at the top left of the panel.
|
||||
|
||||
Simple back-and-forth conversations work well with the assistant. However, there may come a time when you want to modify the previous text in the conversation and steer it in a different direction.
|
||||
|
||||
### Editing a Conversation
|
||||
|
||||
The assistant gives you the flexibility to have control over the conversation. You can freely edit any previous text, including the responses from the assistant. If you want to remove a message block entirely, simply place your cursor at the beginning of the block and use the `delete` key. A typical workflow might involve making edits and adjustments throughout the conversation to refine your inquiry or provide additional context. Here's an example:
|
||||
|
||||
1. Write text in a `You` block.
|
||||
2. Submit the message with `cmd-enter`.
|
||||
3. Receive an `Assistant` response that doesn't meet your expectations.
|
||||
4. Cancel the response with `escape`.
|
||||
5. Erase the content of the `Assistant` message block and remove the block entirely.
|
||||
6. Add additional context to your original message.
|
||||
7. Submit the message with `cmd-enter`.
|
||||
|
||||
Being able to edit previous messages gives you control over how tokens are used. You don't need to start up a new context to correct a mistake or to add additional context, and you don't have to waste tokens by submitting follow-up corrections.
|
||||
|
||||
Some additional points to keep in mind:
|
||||
|
||||
- You are free to change the model type at any point in the conversation.
|
||||
- You can cycle the role of a message block by clicking on the role, which is useful when you receive a response in an `Assistant` block that you want to edit and send back up as a `You` block.
|
||||
|
||||
### Saving and Loading Conversations
|
||||
|
||||
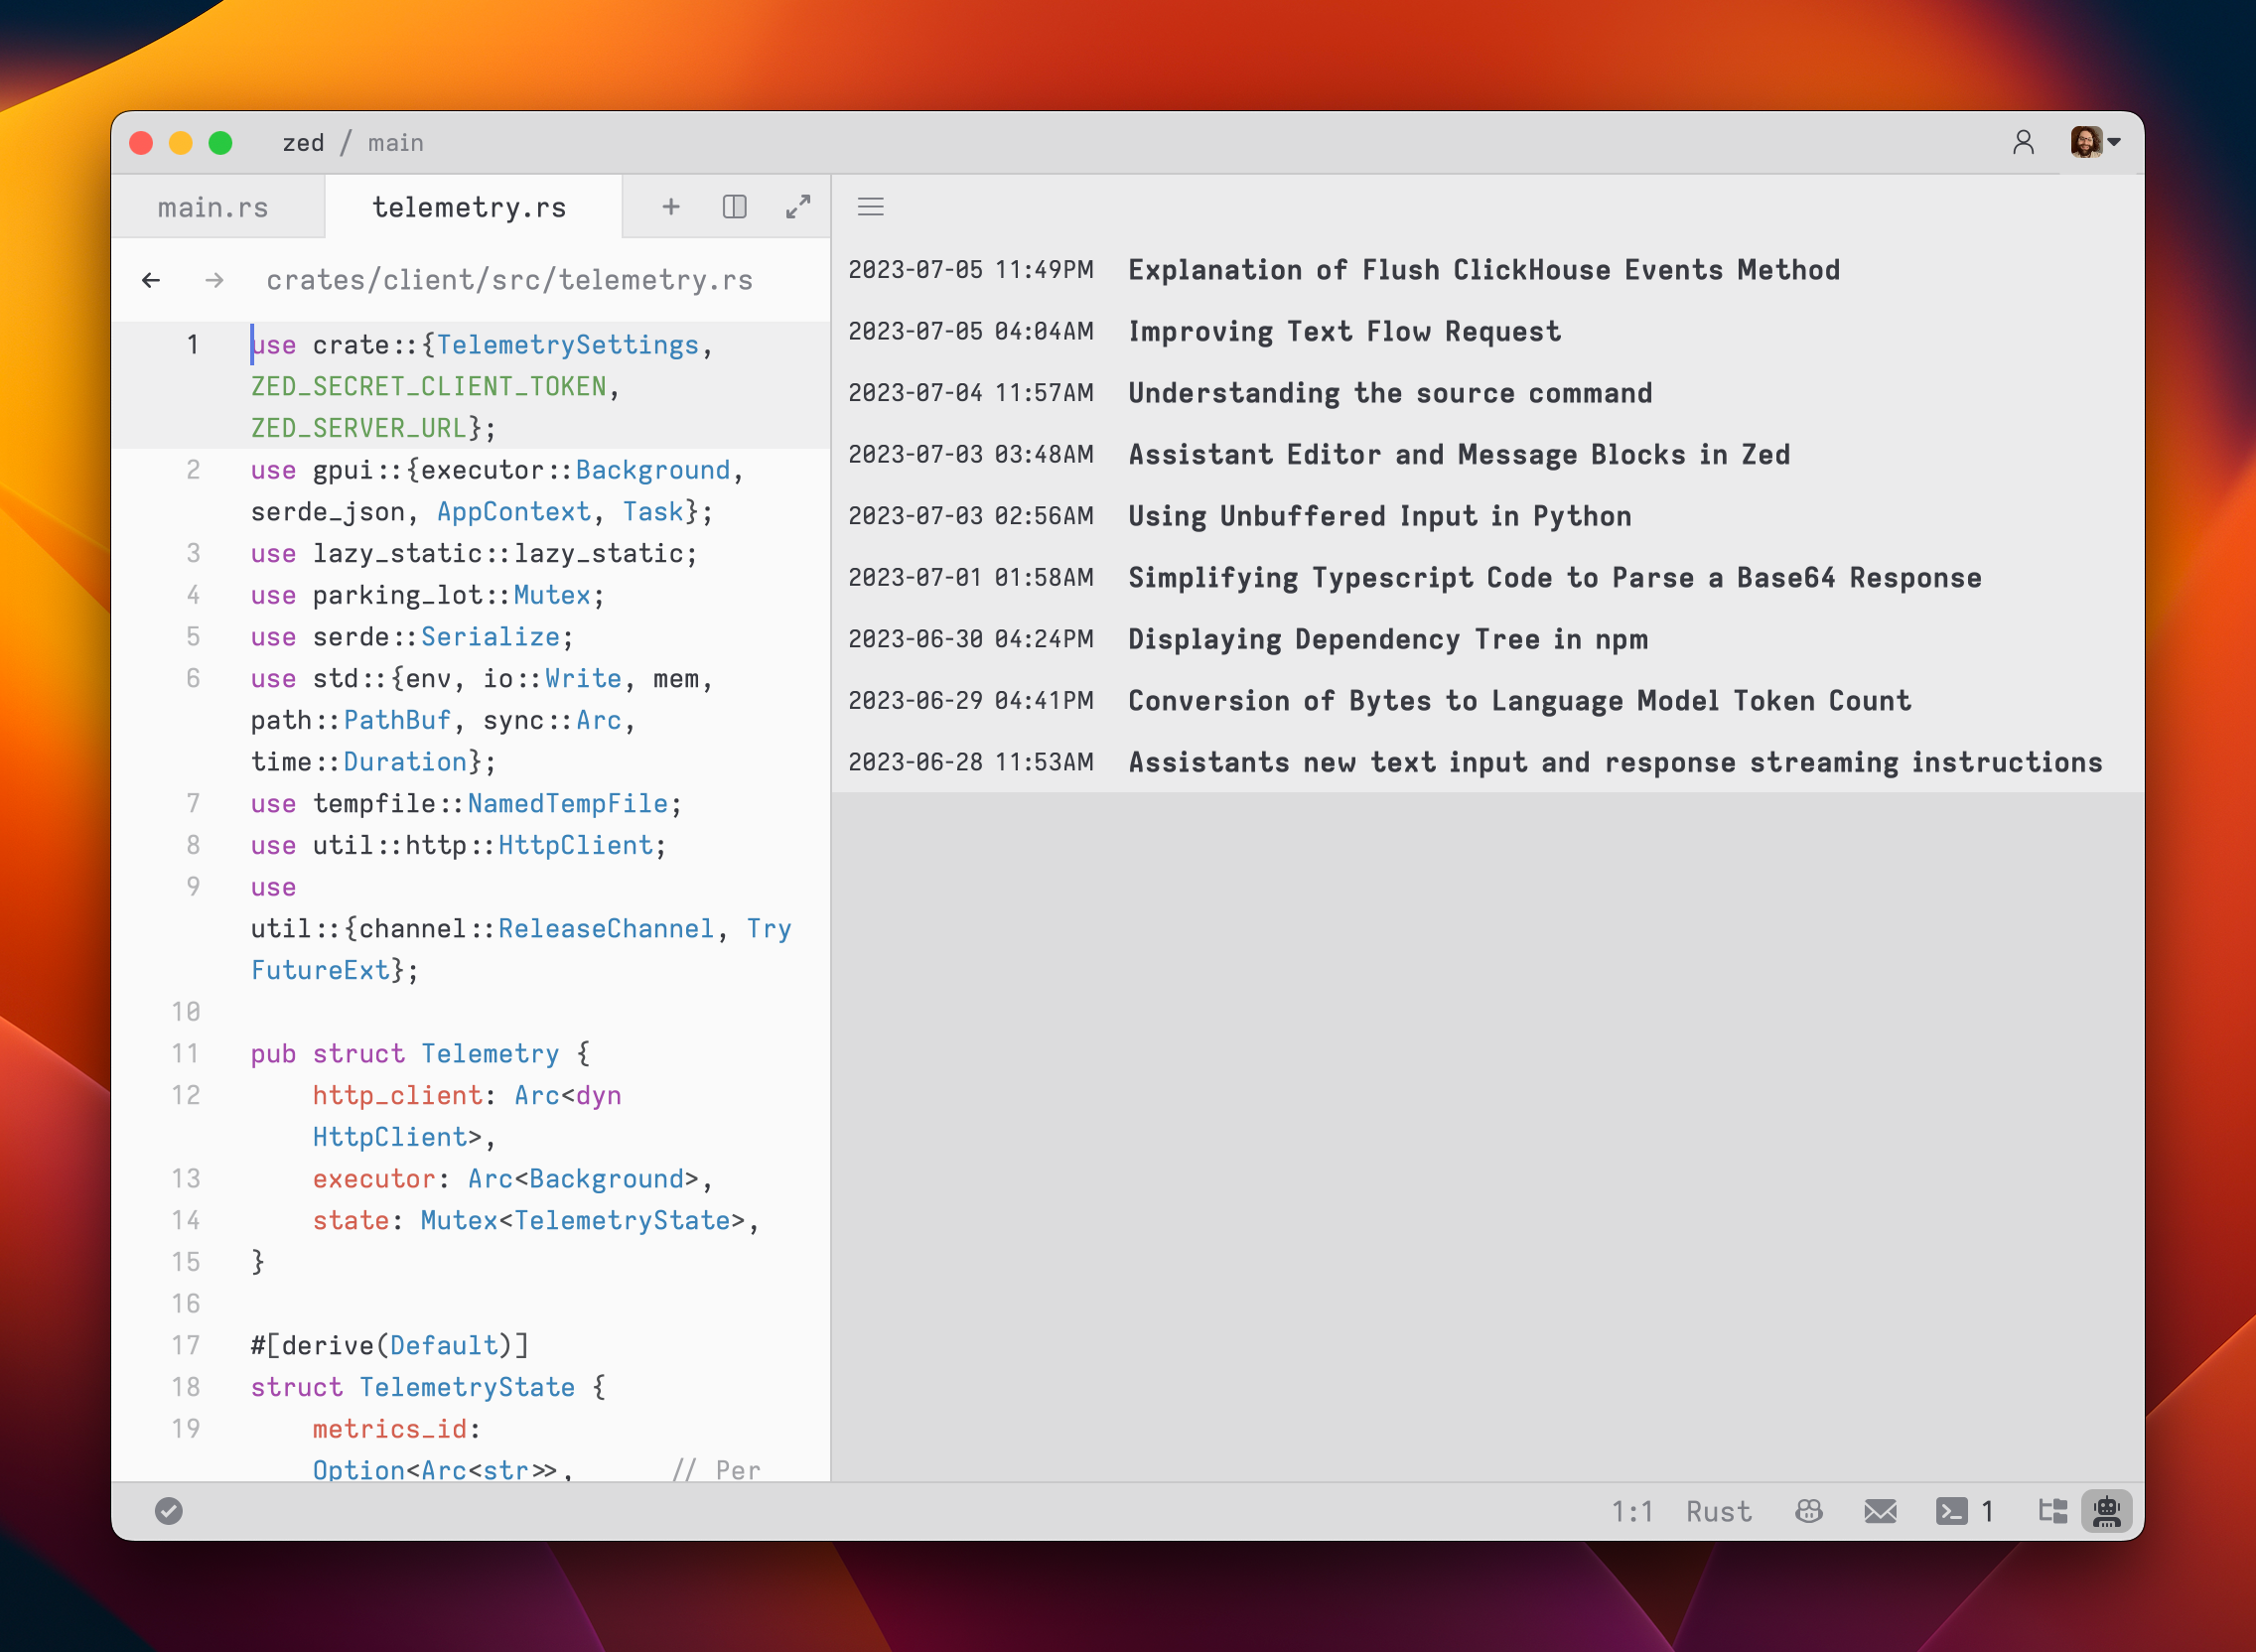
After you submit your first message, a name for your conversation is generated by the language model, and the conversation is automatically saved to your file system in `~/.config/zed/conversations`. You can access and load previous messages by clicking on the hamburger button in the top-left corner of the assistant panel.
|
||||
|
||||
|
||||
|
||||
### Adding Prompts
|
||||
|
||||
You can customize the default prompts used in new context editors by opening the `Prompt Library`.
|
||||
|
||||
Open the `Prompt Library` using either the menu in the top right of the assistant panel and choosing the `Prompt Library` option, or by using the `assistant: deploy prompt library` command when the assistant panel is focused.
|
||||
|
||||
### Viewing Past Contexts
|
||||
|
||||
You can view all previous contexts by opening the `History` tab in the assistant panel.
|
||||
|
||||
Open the `History` using the menu in the top right of the assistant panel and choosing `History`.
|
||||
|
||||
### Slash Commands
|
||||
|
||||
Slash commands enhance the assistant's capabilities. Begin by typing a `/` at the beginning of the line to see a list of available commands:
|
||||
|
||||
- `/default`: Inserts the default prompt into the context
|
||||
- `/diagnostics`: Injects errors reported by the project's language server into the context
|
||||
- `/fetch`: Inserts the content of a webpage and inserts it into the context
|
||||
- `/file`: Inserts a single file or a directory of files into the context
|
||||
- `/now`: Inserts the current date and time into the context
|
||||
- `/prompt`: Adds a custom-configured prompt to the context (see Prompt Library)
|
||||
- `/search`: Performs semantic search for content in your project based on natural language
|
||||
- `/symbols`: Inserts the current tab's active symbols into the context
|
||||
- `/tab`: Inserts the content of the active tab or all open tabs into the context
|
||||
- `/terminal`: Inserts a select number of lines of output from the terminal
|
||||
|
||||
## Inline Assistant
|
||||
|
||||
You can use `ctrl-enter` to open the inline assistant in both a normal editor, within the assistant panel, and even within the terminal panel.
|
||||
|
||||
The inline assistant allows you to send the current selection (or the current line) to a language model and modify the selection with the language model's response. You can also perform multiple generation requests in parallel by pressing `ctrl-enter` with multiple cursors, or by pressing `ctrl-enter` with a selection that spans multiple excerpts in a multibuffer.
|
||||
|
||||
The inline assistant pulls its context from the assistant panel, allowing you to provide additional instructions or rules for code transformations.
|
||||
|
||||
To create a custom keybinding that prefills a prompt, you can add the following format in your keymap:
|
||||
|
||||
```json
|
||||
[
|
||||
{
|
||||
"context": "Editor && mode == full",
|
||||
"bindings": {
|
||||
"ctrl-shift-enter": [
|
||||
"assistant::InlineAssist",
|
||||
{ "prompt": "Build a snake game" }
|
||||
]
|
||||
}
|
||||
}
|
||||
]
|
||||
```
|
||||
|
||||
## Advanced: Overriding Prompt Templates
|
||||
|
||||
Zed allows you to override the default prompts used for various assistant features by placing custom Handlebars (.hbs) templates in your `~/.config/zed/prompts/templates` directory. The following templates can be overridden:
|
||||
|
||||
1. `content_prompt.hbs`: Used for generating content in the editor.
|
||||
Format:
|
||||
|
||||
```handlebars
|
||||
You are an AI programming assistant. Your task is to
|
||||
{{#if is_insert}}insert{{else}}rewrite{{/if}}
|
||||
{{content_type}}{{#if language_name}} in {{language_name}}{{/if}}
|
||||
based on the following context and user request. Context:
|
||||
{{#if is_truncated}}
|
||||
[Content truncated...]
|
||||
{{/if}}
|
||||
{{document_content}}
|
||||
{{#if is_truncated}}
|
||||
[Content truncated...]
|
||||
{{/if}}
|
||||
|
||||
User request:
|
||||
{{user_prompt}}
|
||||
|
||||
{{#if rewrite_section}}
|
||||
Please rewrite the section enclosed in
|
||||
<rewrite_this></rewrite_this>
|
||||
tags.
|
||||
{{else}}
|
||||
Please insert your response at the
|
||||
<insert_here></insert_here>
|
||||
tag.
|
||||
{{/if}}
|
||||
|
||||
Provide only the
|
||||
{{content_type}}
|
||||
content in your response, without any additional explanation.
|
||||
```
|
||||
|
||||
2. `terminal_assistant_prompt.hbs`: Used for the terminal assistant feature.
|
||||
Format:
|
||||
|
||||
```handlebars
|
||||
You are an AI assistant for a terminal emulator. Provide helpful responses to
|
||||
user queries about terminal commands, file systems, and general computer
|
||||
usage. System information: - Operating System:
|
||||
{{os}}
|
||||
- Architecture:
|
||||
{{arch}}
|
||||
{{#if shell}}
|
||||
- Shell:
|
||||
{{shell}}
|
||||
{{/if}}
|
||||
{{#if working_directory}}
|
||||
- Current Working Directory:
|
||||
{{working_directory}}
|
||||
{{/if}}
|
||||
|
||||
Latest terminal output:
|
||||
{{#each latest_output}}
|
||||
{{this}}
|
||||
{{/each}}
|
||||
|
||||
User query:
|
||||
{{user_prompt}}
|
||||
|
||||
Provide a clear and concise response to the user's query, considering the
|
||||
given system information and latest terminal output if relevant.
|
||||
```
|
||||
|
||||
3. `edit_workflow.hbs`: Used for generating the edit workflow prompt.
|
||||
|
||||
4. `step_resolution.hbs`: Used for generating the step resolution prompt.
|
||||
|
||||
You can customize these templates to better suit your needs while maintaining the core structure and variables used by Zed. Zed will automatically reload your prompt overrides when they change on disk. Consult Zed's assets/prompts directory for current versions you can play with.
|
||||
|
||||
Be sure you want to override these, as you'll miss out on iteration on our built-in features. This should be primarily used when developing Zed.
|
||||
|
||||
## Setup Instructions
|
||||
|
||||
### OpenAI
|
||||
|
||||
<!--
|
||||
TBD: OpenAI Setup flow: Review/Correct/Simplify
|
||||
-->
|
||||
|
||||
1. Create an [OpenAI API key](https://platform.openai.com/account/api-keys)
|
||||
2. Make sure that your OpenAI account has credits
|
||||
3. Open the assistant panel, using either the `assistant: toggle focus` or the `workspace: toggle right dock` action in the command palette (`cmd-shift-p`).
|
||||
4. Make sure the assistant panel is focused:
|
||||
|
||||
|
||||
|
||||
The OpenAI API key will be saved in your keychain.
|
||||
|
||||
Zed will also use the `OPENAI_API_KEY` environment variable if it's defined.
|
||||
|
||||
#### OpenAI Custom Endpoint
|
||||
|
||||
You can use a custom API endpoint for OpenAI, as long as it's compatible with the OpenAI API structure.
|
||||
|
||||
To do so, add the following to your Zed `settings.json`:
|
||||
|
||||
```json
|
||||
{
|
||||
"language_models": {
|
||||
"openai": {
|
||||
"api_url": "http://localhost:11434/v1"
|
||||
}
|
||||
}
|
||||
}
|
||||
```
|
||||
|
||||
The custom URL here is `http://localhost:11434/v1`.
|
||||
|
||||
### Ollama
|
||||
|
||||
Download and install Ollama from [ollama.com/download](https://ollama.com/download) (Linux or macOS) and ensure it's running with `ollama --version`.
|
||||
|
||||
You can use Ollama with the Zed assistant by making Ollama appear as an OpenAPI endpoint.
|
||||
|
||||
1. Download, for example, the `mistral` model with Ollama:
|
||||
|
||||
```sh
|
||||
ollama pull mistral
|
||||
```
|
||||
|
||||
2. Make sure that the Ollama server is running. You can start it either via running the Ollama app, or launching:
|
||||
|
||||
```sh
|
||||
ollama serve
|
||||
```
|
||||
|
||||
3. In the assistant panel, select one of the Ollama models using the model dropdown.
|
||||
4. (Optional) If you want to change the default URL that is used to access the Ollama server, you can do so by adding the following settings:
|
||||
|
||||
```json
|
||||
{
|
||||
"language_models": {
|
||||
"ollama": {
|
||||
"api_url": "http://localhost:11434"
|
||||
}
|
||||
}
|
||||
}
|
||||
```
|
||||
|
||||
### Anthropic
|
||||
|
||||
You can use Claude 3.5 Sonnet with the Zed assistant by choosing it via the model dropdown in the assistant panel.
|
||||
|
||||
You can obtain an API key [here](https://console.anthropic.com/settings/keys).
|
||||
|
||||
Even if you pay for Claude Pro, you will still have to [pay for additional credits](https://console.anthropic.com/settings/plans) to use it via the API.
|
||||
|
||||
### Google Gemini
|
||||
|
||||
You can use Gemini 1.5 Pro/Flash with the Zed assistant by choosing it via the model dropdown in the assistant panel.
|
||||
|
||||
You can obtain an API key [here](https://aistudio.google.com/app/apikey).
|
||||
|
||||
### GitHub Copilot Chat
|
||||
|
||||
You can use GitHub Copilot chat with the Zed assistant by choosing it via the model dropdown in the assistant panel.
|
||||
70
docs/src/assistant/assistant-panel.md
Normal file
70
docs/src/assistant/assistant-panel.md
Normal file
@@ -0,0 +1,70 @@
|
||||
# Assistant Panel
|
||||
|
||||
The assistant panel provides you with a way to interact with large language models. The assistant is useful for various tasks, such as generating code, asking questions about existing code, and even writing plaintext, such as emails and documentation.
|
||||
|
||||
To open the assistant panel, toggle the right dock by using the `workspace: toggle right dock` action in the command palette or by using the <kbd>cmd-r|ctrl-alt-b</kbd> shortcut.
|
||||
|
||||
> **Note**: A custom [key binding](./key-bindings.md) can be set to toggle the right dock.
|
||||
|
||||
Once you have [configured a provider](/assistant/configuration.md#providers), you can interact with the provider's language models in a context editor.
|
||||
|
||||

|
||||
|
||||
To create a new context editor, press <kbd>cmd-n|ctrl-n</kbd> or use the menu in the top right of the assistant panel and select the `New Context` option.
|
||||
|
||||
In the context editor, select a model from one of the configured providers, type a message in the `You` block, and submit with <kbd>cmd-enter|ctrl-enter</kbd>.
|
||||
|
||||
### Interacting with the Assistant
|
||||
|
||||
The context editor in Zed functions similarly to any other editor. You can use custom key bindings and work with multiple cursors, allowing for seamless transitions between coding and engaging in discussions with the language models.
|
||||
|
||||
However, the assistant editor differs with the inclusion of message blocks. These blocks serve as containers for text that correspond to different roles within the context. These roles include:
|
||||
|
||||
- `You`
|
||||
- `Assistant`
|
||||
- `System`
|
||||
|
||||
To begin, select a model and type a message in a `You` block.
|
||||
|
||||

|
||||
|
||||
As you type, the remaining tokens count for the selected model is updated.
|
||||
|
||||
Inserting text from an editor is as simple as highlighting the text and running `assistant: quote selection` (<kbd>cmd+shift+>|ctrl+shift+></kbd>); Zed will wrap it in a fenced code block if it is code.
|
||||
|
||||

|
||||
|
||||
To submit a message, use <kbd>cmd-enter|ctrl-enter</kbd> (`assistant: assist`). Unlike typical chat applications where pressing <kbd>enter</kbd> would submit the message, in the assistant editor, our goal was to make it feel as close to a regular editor as possible. So, pressing <kbd>enter</kbd> simply inserts a new line.
|
||||
|
||||
After submitting a message, the assistant's response will be streamed below, in an `Assistant` message block.
|
||||
|
||||

|
||||
|
||||
The stream can be canceled at any point with <kbd>escape</kbd>. This is useful if you realize early on that the response is not what you were looking for.
|
||||
|
||||
If you want to start a new conversation at any time, you can hit <kbd>cmd-n|ctrl-n</kbd> or use the `New Context` menu option in the hamburger menu at the top left of the panel.
|
||||
|
||||
Simple back-and-forth conversations work well with the assistant. However, there may come a time when you want to modify the previous text in the conversation and steer it in a different direction.
|
||||
|
||||
### Editing a Context
|
||||
|
||||
> **Note**: Wondering about Context vs Conversation? [Read more here](/assistant/contexts.md).
|
||||
|
||||
The assistant gives you the flexibility to have control over the context. You can freely edit any previous text, including the responses from the assistant. If you want to remove a message block entirely, simply place your cursor at the beginning of the block and use the `delete` key. A typical workflow might involve making edits and adjustments throughout the context to refine your inquiry or provide additional information. Here's an example:
|
||||
|
||||
1. Write text in a `You` block.
|
||||
2. Submit the message with <kbd>cmd-enter|ctrl-enter</kbd>.
|
||||
3. Receive an `Assistant` response that doesn't meet your expectations.
|
||||
4. Cancel the response with <kbd>escape</kbd>.
|
||||
5. Erase the content of the `Assistant` message block and remove the block entirely.
|
||||
6. Add additional context to your original message.
|
||||
7. Submit the message with <kbd>cmd-enter|ctrl-enter</kbd>.
|
||||
|
||||
Being able to edit previous messages gives you control over how tokens are used. You don't need to start up a new context to correct a mistake or to add additional information, and you don't have to waste tokens by submitting follow-up corrections.
|
||||
|
||||
> **Note**: The act of editing past messages is often referred to as "Rewriting History" in the context of the language models.
|
||||
|
||||
Some additional points to keep in mind:
|
||||
|
||||
- You are free to change the model type at any point in the conversation.
|
||||
- You can cycle the role of a message block by clicking on the role, which is useful when you receive a response in an `Assistant` block that you want to edit and send back up as a `You` block.
|
||||
21
docs/src/assistant/assistant.md
Normal file
21
docs/src/assistant/assistant.md
Normal file
@@ -0,0 +1,21 @@
|
||||
# Assistant
|
||||
|
||||
The Assistant is a powerful tool that integrates large language models into your development workflow.
|
||||
|
||||
This section covers various aspects of the Assistant:
|
||||
|
||||
- [Assistant Panel](./assistant-panel.md): Create and collaboratively edit new contexts, and manage interactions with language models.
|
||||
|
||||
- [Inline Assistant](./inline-assistant.md): Discover how to use the Assistant to power inline transformations directly within your code editor and terminal.
|
||||
|
||||
- [Providers & Configuration](./configuration.md): Configure the Assistant, and set up different language model providers like Anthropic, OpenAI, Ollama, Google Gemini, and GitHub Copilot Chat.
|
||||
|
||||
- [Introducing Contexts](./contexts.md): Learn about contexts (similar to conversations), and learn how they power your interactions between you, your project, and the assistant/model.
|
||||
|
||||
- [Using Commands](./commands.md): Explore slash commands that enhance the Assistant's capabilities and future extensibility.
|
||||
|
||||
- [Prompting & Prompt Library](./prompting.md): Learn how to write and save prompts, how to use the Prompt Library, and how to edit prompt templates.
|
||||
|
||||
- [Context Servers](./context-servers.md): Learn how to add custom slash commands implemented in external codebases with the Context Server Protocol.
|
||||
|
||||
- [Model Context Protocol](./model-context-protocol.md): Read the full specification of the Model Context Protocol that Context Servers follow to interface with the Assistant.
|
||||
108
docs/src/assistant/commands.md
Normal file
108
docs/src/assistant/commands.md
Normal file
@@ -0,0 +1,108 @@
|
||||
# Assistant Commands
|
||||
|
||||
## Overview
|
||||
|
||||
Slash commands enhance the assistant's capabilities. Begin by typing a `/` at the beginning of the line to see a list of available commands:
|
||||
|
||||
- `/default`: Inserts the default prompt into the context
|
||||
- `/diagnostics`: Injects errors reported by the project's language server into the context
|
||||
- `/fetch`: Inserts the content of a webpage and inserts it into the context
|
||||
- `/file`: Inserts a single file or a directory of files into the context
|
||||
- `/now`: Inserts the current date and time into the context
|
||||
- `/prompt`: Adds a custom-configured prompt to the context (see Prompt Library)
|
||||
- `/symbols`: Inserts the current tab's active symbols into the context
|
||||
- `/tab`: Inserts the content of the active tab or all open tabs into the context
|
||||
- `/terminal`: Inserts a select number of lines of output from the terminal
|
||||
|
||||
### Other Commands:
|
||||
|
||||
- `/search`: Performs semantic search for content in your project based on natural language
|
||||
- Not generally available yet, but some users may have access to it.
|
||||
- `/workflow`: Opts into the edit workflow for a specific context
|
||||
- Not generally available yet.
|
||||
|
||||
> **Note:** Remember, commands are only evaluated when the context is created or when the command is inserted, so a command like `/now` won't continuously update, or `/file` commands won't keep their contents up to date.
|
||||
|
||||
## `/default`
|
||||
|
||||
Read more about `/default` in the [Prompting: Editing the Default Prompt](/assistant/prompting.md#default-prompt) section.
|
||||
|
||||
Usage: `/default`
|
||||
|
||||
## `/diagnostics`
|
||||
|
||||
The `/diagnostics` command injects errors reported by the project's language server into the context. This is useful for getting an overview of current issues in your project.
|
||||
|
||||
Usage: `/diagnostics [--include-warnings] [path]`
|
||||
|
||||
- `--include-warnings`: Optional flag to include warnings in addition to errors.
|
||||
- `path`: Optional path to limit diagnostics to a specific file or directory.
|
||||
|
||||
## `/file`
|
||||
|
||||
The `/file` command inserts the content of a single file or a directory of files into the context. This allows you to reference specific parts of your project in your conversation with the assistant.
|
||||
|
||||
Usage: `/file <path>`
|
||||
|
||||
You can use glob patterns to match multiple files or directories.
|
||||
|
||||
Examples:
|
||||
|
||||
- `/file src/index.js` - Inserts the content of `src/index.js` into the context.
|
||||
- `/file src/*.js` - Inserts the content of all `.js` files in the `src` directory.
|
||||
- `/file src` - Inserts the content of all files in the `src` directory.
|
||||
|
||||
## `/now`
|
||||
|
||||
The `/now` command inserts the current date and time into the context. This can be useful letting the language model know the current time (and by extension, how old their current knowledge base is).
|
||||
|
||||
Usage: `/now`
|
||||
|
||||
## `/prompt`
|
||||
|
||||
The `/prompt` command inserts a prompt from the prompt library into the context. It can also be used to nest prompts within prompts.
|
||||
|
||||
Usage: `/prompt <prompt_name>`
|
||||
|
||||
Related: `/default`
|
||||
|
||||
## `/symbols`
|
||||
|
||||
The `/symbols` command inserts the active symbols (functions, classes, etc.) from the current tab into the context. This is useful for getting an overview of the structure of the current file.
|
||||
|
||||
Usage: `/symbols`
|
||||
|
||||
## `/tab`
|
||||
|
||||
The `/tab` command inserts the content of the active tab or all open tabs into the context. This allows you to reference the content you're currently working on.
|
||||
|
||||
Usage: `/tab [tab_name|all]`
|
||||
|
||||
- `tab_name`: Optional name of a specific tab to insert.
|
||||
- `all`: Insert content from all open tabs.
|
||||
|
||||
Examples:
|
||||
|
||||
- `/tab` - Inserts the content of the active tab.
|
||||
- `/tab "index.js"` - Inserts the content of the tab named "index.js".
|
||||
- `/tab all` - Inserts the content of all open tabs.
|
||||
|
||||
## `/terminal`
|
||||
|
||||
The `/terminal` command inserts a select number of lines of output from the terminal into the context. This is useful for referencing recent command outputs or logs.
|
||||
|
||||
Usage: `/terminal [<number>]`
|
||||
|
||||
- `<number>`: Optional parameter to specify the number of lines to insert (default is a 50).
|
||||
|
||||
## `/workflow`
|
||||
|
||||
The `/workflow` command inserts a prompt that opts into the edit workflow. This sets up the context for the assistant to suggest edits to your code.
|
||||
|
||||
Usage: `/workflow`
|
||||
|
||||
## Extensibility
|
||||
|
||||
Additional slash commands can be provided by extensions.
|
||||
|
||||
See [Extension: Slash Commands](../extensions/slash-commands.md) to learn how to create your own.
|
||||
250
docs/src/assistant/configuration.md
Normal file
250
docs/src/assistant/configuration.md
Normal file
@@ -0,0 +1,250 @@
|
||||
# Configuring the Assistant
|
||||
|
||||
## Providers {#providers}
|
||||
|
||||
The following providers are supported:
|
||||
|
||||
- [Zed AI (Configured by default when signed in)](#zed-ai)
|
||||
- [Anthropic](#anthropic)
|
||||
- [GitHub Copilot Chat](#github-copilot-chat) [^1]
|
||||
- [Google AI](#google-ai) [^1]
|
||||
- [Ollama](#ollama)
|
||||
- [OpenAI](#openai)
|
||||
|
||||
To configure different providers, run `assistant: show configuration` in the command palette, or click on the hamburger menu at the top-right of the assistant panel and select "Configure".
|
||||
|
||||
[^1]: This provider does not support [`/workflow`](./commands#workflow-not-generally-available) command.
|
||||
|
||||
To further customize providers, you can use `settings.json` to do that as follows:
|
||||
|
||||
- [Configuring endpoints](#custom-endpoint)
|
||||
- [Configuring timeouts](#provider-timeout)
|
||||
- [Configuring default model](#default-model)
|
||||
|
||||
### Zed AI {#zed-ai}
|
||||
|
||||
A hosted service providing convenient and performant support for AI-enabled coding in Zed, powered by Anthropic's Claude 3.5 Sonnet and accessible just by signing in.
|
||||
|
||||
### Anthropic {#anthropic}
|
||||
|
||||
You can use Claude 3.5 Sonnet via [Zed AI](#zed-ai) for free. To use other Anthropic models you will need to configure it by providing your own API key.
|
||||
|
||||
1. You can obtain an API key [here](https://console.anthropic.com/settings/keys).
|
||||
2. Make sure that your Anthropic account has credits
|
||||
3. Open the configuration view (`assistant: show configuration`) and navigate to the Anthropic section
|
||||
4. Enter your Anthropic API key
|
||||
|
||||
Even if you pay for Claude Pro, you will still have to [pay for additional credits](https://console.anthropic.com/settings/plans) to use it via the API.
|
||||
|
||||
Zed will also use the `ANTHROPIC_API_KEY` environment variable if it's defined.
|
||||
|
||||
#### Anthropic Custom Models {#anthropic-custom-models}
|
||||
|
||||
You can add custom models to the Anthropic provider, by adding the following to your Zed `settings.json`:
|
||||
|
||||
```json
|
||||
{
|
||||
"language_models": {
|
||||
"anthropic": {
|
||||
"available_models": [
|
||||
{
|
||||
"name": "some-model",
|
||||
"display_name": "some-model",
|
||||
"max_tokens": 128000,
|
||||
"max_output_tokens": 2560,
|
||||
"cache_configuration": {
|
||||
"max_cache_anchors": 10,
|
||||
"min_total_token": 10000,
|
||||
"should_speculate": false
|
||||
},
|
||||
"tool_override": "some-model-that-supports-toolcalling"
|
||||
}
|
||||
]
|
||||
}
|
||||
}
|
||||
}
|
||||
```
|
||||
|
||||
Custom models will be listed in the model dropdown in the assistant panel.
|
||||
|
||||
### GitHub Copilot Chat {#github-copilot-chat}
|
||||
|
||||
You can use GitHub Copilot chat with the Zed assistant by choosing it via the model dropdown in the assistant panel.
|
||||
|
||||
### Google AI {#google-ai}
|
||||
|
||||
You can use Gemini 1.5 Pro/Flash with the Zed assistant by choosing it via the model dropdown in the assistant panel.
|
||||
|
||||
1. Create an API key [here](https://aistudio.google.com/app/apikey).
|
||||
2. Open the configuration view (`assistant: show configuration`) and navigate to the OpenAI section
|
||||
3. Enter your Google AI API key
|
||||
|
||||
The Google AI API key will be saved in your keychain.
|
||||
|
||||
Zed will also use the `GOOGLE_AI_API_KEY` environment variable if it's defined.
|
||||
|
||||
#### Google AI custom models {#google-ai-custom-models}
|
||||
|
||||
You can add custom models to the GoogleAI provider, by adding the following to your Zed `settings.json`:
|
||||
|
||||
```json
|
||||
{
|
||||
"language_models": {
|
||||
"google": {
|
||||
"available_models": [
|
||||
{
|
||||
"name": "custom-model",
|
||||
"max_tokens": 128000
|
||||
}
|
||||
]
|
||||
}
|
||||
}
|
||||
}
|
||||
```
|
||||
|
||||
Custom models will be listed in the model dropdown in the assistant panel.
|
||||
|
||||
### Ollama {#ollama}
|
||||
|
||||
Download and install Ollama from [ollama.com/download](https://ollama.com/download) (Linux or macOS) and ensure it's running with `ollama --version`.
|
||||
|
||||
You can use Ollama with the Zed assistant by making Ollama appear as an OpenAPI endpoint.
|
||||
|
||||
1. Download, for example, the `mistral` model with Ollama:
|
||||
|
||||
```sh
|
||||
ollama pull mistral
|
||||
```
|
||||
|
||||
2. Make sure that the Ollama server is running. You can start it either via running the Ollama app, or launching:
|
||||
|
||||
```sh
|
||||
ollama serve
|
||||
```
|
||||
|
||||
3. In the assistant panel, select one of the Ollama models using the model dropdown.
|
||||
4. (Optional) If you want to change the default URL that is used to access the Ollama server, you can do so by adding the following settings:
|
||||
|
||||
```json
|
||||
{
|
||||
"language_models": {
|
||||
"ollama": {
|
||||
"api_url": "http://localhost:11434"
|
||||
}
|
||||
}
|
||||
}
|
||||
```
|
||||
|
||||
### OpenAI {#openai}
|
||||
|
||||
1. Create an [OpenAI API key](https://platform.openai.com/account/api-keys)
|
||||
2. Make sure that your OpenAI account has credits
|
||||
3. Open the configuration view (`assistant: show configuration`) and navigate to the OpenAI section
|
||||
4. Enter your OpenAI API key
|
||||
|
||||
The OpenAI API key will be saved in your keychain.
|
||||
|
||||
Zed will also use the `OPENAI_API_KEY` environment variable if it's defined.
|
||||
|
||||
#### OpenAI Custom Models {#openai-custom-models}
|
||||
|
||||
You can add custom models to the OpenAI provider, by adding the following to your Zed `settings.json`:
|
||||
|
||||
```json
|
||||
{
|
||||
"language_models": {
|
||||
"openai": {
|
||||
"version": "1",
|
||||
"available_models": [
|
||||
{
|
||||
"name": "custom-model",
|
||||
"max_tokens": 128000
|
||||
}
|
||||
]
|
||||
}
|
||||
}
|
||||
}
|
||||
```
|
||||
|
||||
Custom models will be listed in the model dropdown in the assistant panel.
|
||||
|
||||
### Advanced configuration {#advanced-configuration}
|
||||
|
||||
#### Example Configuration
|
||||
|
||||
```json
|
||||
{
|
||||
"assistant": {
|
||||
"enabled": true,
|
||||
"default_model": {
|
||||
"provider": "zed.dev",
|
||||
"model": "claude-3-5-sonnet"
|
||||
},
|
||||
"version": "2",
|
||||
"button": true,
|
||||
"default_width": 480,
|
||||
"dock": "right"
|
||||
}
|
||||
}
|
||||
```
|
||||
|
||||
#### Custom endpoints {#custom-endpoint}
|
||||
|
||||
You can use a custom API endpoint for different providers, as long as it's compatible with the providers API structure.
|
||||
|
||||
To do so, add the following to your Zed `settings.json`:
|
||||
|
||||
```json
|
||||
{
|
||||
"language_models": {
|
||||
"some-provider": {
|
||||
"api_url": "http://localhost:11434/v1"
|
||||
}
|
||||
}
|
||||
}
|
||||
```
|
||||
|
||||
Where `some-provider` can be any of the following values: `anthropic`, `google`, `ollama`, `openai`.
|
||||
|
||||
#### Custom timeout {#provider-timeout}
|
||||
|
||||
You can customize the timeout that's used for LLM requests, by adding the following to your Zed `settings.json`:
|
||||
|
||||
```json
|
||||
{
|
||||
"language_models": {
|
||||
"some-provider": {
|
||||
"low_speed_timeout_in_seconds": 10
|
||||
}
|
||||
}
|
||||
}
|
||||
```
|
||||
|
||||
Where `some-provider` can be any of the following values: `anthropic`, `copilot_chat`, `google`, `ollama`, `openai`.
|
||||
|
||||
#### Configuring the default model {#default-model}
|
||||
|
||||
The default model can be set via the model dropdown in the assistant panel's top-right corner. Selecting a model saves it as the default.
|
||||
You can also manually edit the `default_model` object in your settings:
|
||||
|
||||
```json
|
||||
{
|
||||
"assistant": {
|
||||
"version": "2",
|
||||
"default_model": {
|
||||
"provider": "zed.dev",
|
||||
"model": "claude-3-5-sonnet"
|
||||
}
|
||||
}
|
||||
}
|
||||
```
|
||||
|
||||
#### Common Panel Settings
|
||||
|
||||
| key | type | default | description |
|
||||
| -------------- | ------- | ------- | ------------------------------------------------------------------------------------- |
|
||||
| enabled | boolean | true | Setting this to `false` will completely disable the assistant |
|
||||
| button | boolean | true | Show the assistant icon |
|
||||
| dock | string | "right" | The default dock position for the assistant panel. Can be ["left", "right", "bottom"] |
|
||||
| default_height | string | null | The pixel height of the assistant panel when docked to the bottom |
|
||||
| default_width | string | null | The pixel width of the assistant panel when docked to the left or right |
|
||||
45
docs/src/assistant/context-servers.md
Normal file
45
docs/src/assistant/context-servers.md
Normal file
@@ -0,0 +1,45 @@
|
||||
# Context Servers
|
||||
|
||||
A Context Server is an experimental interface for defining simple, language-agnostic slash commands in Zed's [Assistant](./assistant.md). Context Servers allow you to extend Zed's Assistant to interface with external capabilities and systems in a language-agnostic way.
|
||||
|
||||
If slash commands allow you to extend the Assistant with new capabilities, Context Servers follow a simple protocol for registering and making use of those capabilities.
|
||||
|
||||
## Using a Context Server
|
||||
To configure Zed to use a Context Server, add the command required to start the server to your [settings](./configuring-zed.md):
|
||||
|
||||
```json
|
||||
{
|
||||
"experimental": {
|
||||
"context_servers": [
|
||||
{
|
||||
"id": "python_context_server",
|
||||
"executable": "python",
|
||||
"args": ["-m", "my_context_server"]
|
||||
}
|
||||
]
|
||||
}
|
||||
}
|
||||
```
|
||||
|
||||
## Developing a Context Server
|
||||
|
||||
A Context Server is a server listening for JSON-RPC requests over stdin/stdout. The server must follow the Model Context Protocol (defined below) in order to declare its capabilities such that Zed can make use of them.
|
||||
|
||||
### Implementing a Context Server
|
||||
|
||||
Context Servers are JSON-RPC servers communicating over stdio. Context Servers must comply with the [Model Context Protocol (MCP)](./model_context_protocol).
|
||||
|
||||
See [python-context-server](https://github.com/zed-industries/python-context-server) for a minimal working example.
|
||||
|
||||
Currently, Zed's client only implements a subset of the protocol required to support custom prompt insertions and manipulations. This is likely to be expanded in the future.
|
||||
|
||||
### Should you write a Context Server?
|
||||
|
||||
[Extensions](../extensions.md) are also capable of [adding slash commands to the Assistant](../extensions/slash-commands.md).
|
||||
|
||||
If your slash commands are already implemented in a language other than Rust, wrapping them in a Context Server implementation will likely be the fastest way to plug them into Zed.
|
||||
|
||||
An Extension should be preferred when:
|
||||
- Your slash commands are implemented in WebAssembly-compatible Rust
|
||||
- You want Zed to manage distribution of your slash commands
|
||||
- You want to publish your slash commands
|
||||
17
docs/src/assistant/contexts.md
Normal file
17
docs/src/assistant/contexts.md
Normal file
@@ -0,0 +1,17 @@
|
||||
# Introducing Contexts
|
||||
|
||||
Contexts are like conversations in most assistant-like tools. A context is a collaborative tool for sharing information between you, your project, and the assistant/model.
|
||||
|
||||
The model can reference content from your active context in the assistant panel, but also elsewhere like the inline assistant.
|
||||
|
||||
### Saving and Loading Contexts
|
||||
|
||||
After you submit your first message, a name for your context is generated by the language model, and the context is automatically saved to your file system in `~/.config/zed/contexts`. You can access and load previous contexts by clicking on the hamburger button in the top-left corner of the assistant panel.
|
||||
|
||||

|
||||
|
||||
### Viewing Past Contexts
|
||||
|
||||
You can view all previous contexts by opening the `History` tab in the assistant panel.
|
||||
|
||||
Open the `History` using the menu in the top right of the assistant panel and choosing `History`.
|
||||
44
docs/src/assistant/inline-assistant.md
Normal file
44
docs/src/assistant/inline-assistant.md
Normal file
@@ -0,0 +1,44 @@
|
||||
# Inline Assistant
|
||||
|
||||
## Using the Inline Assistant
|
||||
|
||||
You can use `ctrl-enter` to open the inline assistant nearly anywhere you can enter text: Editors, the assistant panel, the prompt library, channel notes, and even within the terminal panel.
|
||||
|
||||
The inline assistant allows you to send the current selection (or the current line) to a language model and modify the selection with the language model's response.
|
||||
|
||||
You can also perform multiple generation requests in parallel by pressing `ctrl-enter` with multiple cursors, or by pressing `ctrl-enter` with a selection that spans multiple excerpts in a multibuffer.
|
||||
|
||||
The inline assistant pulls its context from the assistant panel, allowing you to provide additional instructions or rules for code transformations.
|
||||
|
||||
> **Note**: The inline assistant sees the entire active context from the assistant panel. This means the assistant panel's context editor becomes one of the most powerful tools for shaping the results of the inline assistant.
|
||||
|
||||
## Using Prompts & Commands
|
||||
|
||||
While you can't directly use slash commands (and by extension, the `/prompt` command to include prompts) in the inline assistant, you can use them in the active context in the assistant panel.
|
||||
|
||||
A common workflow when using the inline assistant is to create a context in the assistant panel, add the desired context through text, prompts and commands, and then use the inline assistant to generate and apply transformations.
|
||||
|
||||
### Example Recipe - Fixing Errors with the Inline Assistant
|
||||
|
||||
1. Create a new context in the assistant panel.
|
||||
2. Use the `/diagnostic` command to add current diagnostics to the context.
|
||||
3. OR use the `/terminal` command to add the current terminal output to the context (maybe a panic, error, or log?)
|
||||
4. Use the inline assistant to generate a fix for the error.
|
||||
|
||||
## Prefilling Prompts
|
||||
|
||||
To create a custom keybinding that prefills a prompt, you can add the following format in your keymap:
|
||||
|
||||
```json
|
||||
[
|
||||
{
|
||||
"context": "Editor && mode == full",
|
||||
"bindings": {
|
||||
"ctrl-shift-enter": [
|
||||
"assistant::InlineAssist",
|
||||
{ "prompt": "Build a snake game" }
|
||||
]
|
||||
}
|
||||
}
|
||||
]
|
||||
```
|
||||
348
docs/src/assistant/model-context-protocol.md
Normal file
348
docs/src/assistant/model-context-protocol.md
Normal file
@@ -0,0 +1,348 @@
|
||||
# Model Context Protocol
|
||||
|
||||
## Overview
|
||||
|
||||
The Model Context Protocol (MCP) is a JSON-RPC based protocol for communication between a client (e.g., Zed) and context servers. It enables context-aware development assistance through various features like prompts, resources, and tools.
|
||||
|
||||
Currently, Zed's client only implements a subset of the protocol required to support custom prompt insertions and manipulations. This is likely to be expanded in the future.
|
||||
|
||||
## Protocol Basics
|
||||
|
||||
- Communication: JSON-RPC 2.0 over stdio
|
||||
- Versioning: Protocol version negotiated during initialization
|
||||
|
||||
## Message Types
|
||||
|
||||
1. Requests: Client-to-server method calls
|
||||
2. Responses: Server-to-client replies to requests
|
||||
3. Notifications: Unidirectional messages (no response expected)
|
||||
|
||||
## Lifecycle
|
||||
|
||||
1. Client sends `initialize` request
|
||||
2. Server responds with capabilities
|
||||
3. Client sends `initialized` notification
|
||||
4. Normal operation begins
|
||||
|
||||
### Initialize Request
|
||||
|
||||
```json
|
||||
{
|
||||
"jsonrpc": "2.0",
|
||||
"id": 1,
|
||||
"method": "initialize",
|
||||
"params": {
|
||||
"protocolVersion": 1,
|
||||
"capabilities": {
|
||||
"experimental": {},
|
||||
"sampling": {}
|
||||
},
|
||||
"clientInfo": {
|
||||
"name": "Zed",
|
||||
"version": "1.0.0"
|
||||
}
|
||||
}
|
||||
}
|
||||
```
|
||||
|
||||
### Initialize Response
|
||||
|
||||
```json
|
||||
{
|
||||
"jsonrpc": "2.0",
|
||||
"id": 1,
|
||||
"result": {
|
||||
"protocolVersion": 1,
|
||||
"capabilities": {
|
||||
"experimental": {},
|
||||
"logging": {},
|
||||
"prompts": {},
|
||||
"resources": {
|
||||
"subscribe": true
|
||||
},
|
||||
"tools": {}
|
||||
},
|
||||
"serverInfo": {
|
||||
"name": "ExampleServer",
|
||||
"version": "1.0.0"
|
||||
}
|
||||
}
|
||||
}
|
||||
```
|
||||
|
||||
### Initialized Notification
|
||||
|
||||
```json
|
||||
{
|
||||
"jsonrpc": "2.0",
|
||||
"method": "notifications/initialized",
|
||||
"params": {}
|
||||
}
|
||||
```
|
||||
|
||||
## Features
|
||||
|
||||
### Prompts
|
||||
|
||||
#### List Prompts
|
||||
|
||||
Request:
|
||||
```json
|
||||
{
|
||||
"jsonrpc": "2.0",
|
||||
"id": 2,
|
||||
"method": "prompts/list",
|
||||
"params": {}
|
||||
}
|
||||
```
|
||||
|
||||
Response:
|
||||
```json
|
||||
{
|
||||
"jsonrpc": "2.0",
|
||||
"id": 2,
|
||||
"result": {
|
||||
"prompts": [
|
||||
{
|
||||
"name": "examplePrompt",
|
||||
"arguments": [
|
||||
{
|
||||
"name": "arg1",
|
||||
"description": "Description of arg1",
|
||||
"required": true
|
||||
}
|
||||
]
|
||||
}
|
||||
]
|
||||
}
|
||||
}
|
||||
```
|
||||
|
||||
#### Execute Prompt
|
||||
|
||||
Request:
|
||||
```json
|
||||
{
|
||||
"jsonrpc": "2.0",
|
||||
"id": 3,
|
||||
"method": "prompts/get",
|
||||
"params": {
|
||||
"name": "examplePrompt",
|
||||
"arguments": {
|
||||
"arg1": "value1"
|
||||
}
|
||||
}
|
||||
}
|
||||
```
|
||||
|
||||
Response:
|
||||
```json
|
||||
{
|
||||
"jsonrpc": "2.0",
|
||||
"id": 3,
|
||||
"result": {
|
||||
"prompt": "Generated prompt text"
|
||||
}
|
||||
}
|
||||
```
|
||||
|
||||
### Resources
|
||||
|
||||
#### List Resources
|
||||
|
||||
Request:
|
||||
```json
|
||||
{
|
||||
"jsonrpc": "2.0",
|
||||
"id": 4,
|
||||
"method": "resources/list",
|
||||
"params": {}
|
||||
}
|
||||
```
|
||||
|
||||
Response:
|
||||
```json
|
||||
{
|
||||
"jsonrpc": "2.0",
|
||||
"id": 4,
|
||||
"result": {
|
||||
"resourceTemplates": [
|
||||
{
|
||||
"uriTemplate": "template://example/{param}",
|
||||
"name": "Example Template",
|
||||
"description": "Description of the template"
|
||||
}
|
||||
],
|
||||
"resources": [
|
||||
{
|
||||
"uri": "https://example.com/resource",
|
||||
"mimeType": "text/plain"
|
||||
}
|
||||
]
|
||||
}
|
||||
}
|
||||
```
|
||||
|
||||
#### Read Resource
|
||||
|
||||
Request:
|
||||
```json
|
||||
{
|
||||
"jsonrpc": "2.0",
|
||||
"id": 5,
|
||||
"method": "resources/read",
|
||||
"params": {
|
||||
"uri": "https://example.com/resource"
|
||||
}
|
||||
}
|
||||
```
|
||||
|
||||
Response:
|
||||
```json
|
||||
{
|
||||
"jsonrpc": "2.0",
|
||||
"id": 5,
|
||||
"result": {
|
||||
"contents": [
|
||||
{
|
||||
"uri": "https://example.com/resource",
|
||||
"mimeType": "text/plain",
|
||||
"contentType": "text",
|
||||
"text": "Resource content"
|
||||
}
|
||||
]
|
||||
}
|
||||
}
|
||||
```
|
||||
|
||||
#### Subscribe to Resource
|
||||
|
||||
Request:
|
||||
```json
|
||||
{
|
||||
"jsonrpc": "2.0",
|
||||
"id": 6,
|
||||
"method": "resources/subscribe",
|
||||
"params": {
|
||||
"uri": "https://example.com/resource"
|
||||
}
|
||||
}
|
||||
```
|
||||
|
||||
Response:
|
||||
```json
|
||||
{
|
||||
"jsonrpc": "2.0",
|
||||
"id": 6,
|
||||
"result": null
|
||||
}
|
||||
```
|
||||
|
||||
#### Unsubscribe from Resource
|
||||
|
||||
Request:
|
||||
```json
|
||||
{
|
||||
"jsonrpc": "2.0",
|
||||
"id": 7,
|
||||
"method": "resources/unsubscribe",
|
||||
"params": {
|
||||
"uri": "https://example.com/resource"
|
||||
}
|
||||
}
|
||||
```
|
||||
|
||||
Response:
|
||||
```json
|
||||
{
|
||||
"jsonrpc": "2.0",
|
||||
"id": 7,
|
||||
"result": null
|
||||
}
|
||||
```
|
||||
|
||||
### Tools
|
||||
|
||||
#### Call Tool
|
||||
|
||||
Request:
|
||||
```json
|
||||
{
|
||||
"jsonrpc": "2.0",
|
||||
"id": 8,
|
||||
"method": "tools/call",
|
||||
"params": {
|
||||
"name": "exampleTool",
|
||||
"arguments": {
|
||||
"key": "value"
|
||||
}
|
||||
}
|
||||
}
|
||||
```
|
||||
|
||||
Response:
|
||||
```json
|
||||
{
|
||||
"jsonrpc": "2.0",
|
||||
"id": 8,
|
||||
"result": {
|
||||
"output": "Tool execution result"
|
||||
}
|
||||
}
|
||||
```
|
||||
|
||||
### Logging
|
||||
|
||||
#### Set Logging Level
|
||||
|
||||
Request:
|
||||
```json
|
||||
{
|
||||
"jsonrpc": "2.0",
|
||||
"id": 9,
|
||||
"method": "logging/setLevel",
|
||||
"params": {
|
||||
"level": "info"
|
||||
}
|
||||
}
|
||||
```
|
||||
|
||||
Response:
|
||||
```json
|
||||
{
|
||||
"jsonrpc": "2.0",
|
||||
"id": 9,
|
||||
"result": null
|
||||
}
|
||||
```
|
||||
|
||||
### Notifications
|
||||
|
||||
#### Progress
|
||||
|
||||
```json
|
||||
{
|
||||
"jsonrpc": "2.0",
|
||||
"method": "notifications/progress",
|
||||
"params": {
|
||||
"progressToken": "operation1",
|
||||
"progress": 50.0,
|
||||
"total": 100.0
|
||||
}
|
||||
}
|
||||
```
|
||||
|
||||
## Error Handling
|
||||
|
||||
Errors should be returned as standard JSON-RPC 2.0 error objects:
|
||||
|
||||
```json
|
||||
{
|
||||
"jsonrpc": "2.0",
|
||||
"id": null,
|
||||
"error": {
|
||||
"code": -32000,
|
||||
"message": "Error message"
|
||||
}
|
||||
}
|
||||
```
|
||||
224
docs/src/assistant/prompting.md
Normal file
224
docs/src/assistant/prompting.md
Normal file
@@ -0,0 +1,224 @@
|
||||
# Prompting & Prompt Library
|
||||
|
||||
## Using Prompts {#using-prompts}
|
||||
|
||||
Prompts are an essential part of interacting with AI assistants in Zed. They help guide the AI's responses and ensure you get the most relevant and useful information.
|
||||
|
||||
Every new context will start with the [default prompt](#default-prompt), which can be customized.
|
||||
|
||||
Remember that effective prompting is an iterative process. Experiment with different prompt structures and wordings to find what works best for your specific needs and the model you're using.
|
||||
|
||||
Here are some tips for using prompts effectively:
|
||||
|
||||
1. Be specific: Clearly state what you want the AI to do or explain.
|
||||
2. Provide context: Include relevant information about your project or problem.
|
||||
3. Use examples: If applicable, provide examples to illustrate your request.
|
||||
4. Break down complex tasks: For multi-step problems, consider breaking them into smaller, more manageable prompts.
|
||||
|
||||
## Prompt Library {#prompt-library}
|
||||
|
||||
The Prompt Library is an interface for writing and managing prompts. Like other text-driven UIs in Zed, it is a full editor with syntax highlighting, keyboard shortcuts, etc.
|
||||
|
||||
You can use the inline assistant right in the prompt editor, allowing you to automate and rewrite prompts.
|
||||
|
||||
### Opening the Prompt Library
|
||||
|
||||
1. Open the assistant panel.
|
||||
2. Click on the menu in the top right corner.
|
||||
3. Select "Prompt Library" from the dropdown.
|
||||
|
||||
You can also use the `prompt-library: toggle` command.
|
||||
|
||||
### Managing Prompts
|
||||
|
||||
Once a prompt is selected, you can edit it directly in the editor. Its title can be changed from the editor title bar as well.
|
||||
|
||||
Prompts can be duplicated, deleted, or added to the default prompt using the buttons in the prompt editor.
|
||||
|
||||
## Creating a Prompt {#creating-a-prompt}
|
||||
|
||||
To create a prompt, simply open the Prompt Library and click the "+" button. Prompts are stored locally and can be accessed from the library at any time.
|
||||
|
||||
Having a series of prompts specifically tailored to prompt engineering can also help you write consistent and effective prompts.
|
||||
|
||||
The process of writing and refining prompts commonly called "prompt engineering".
|
||||
|
||||
More on prompt engineering:
|
||||
|
||||
- [Anthropic: Prompt Engineering](https://docs.anthropic.com/en/docs/build-with-claude/prompt-engineering/overview)
|
||||
- [OpenAI: Prompt Engineering](https://platform.openai.com/docs/guides/prompt-engineering)
|
||||
|
||||
## Editing the Default Prompt {#default-prompt}
|
||||
|
||||
Zed allows you to customize the default prompt used in new context editors. Or to be more precise, it uses a series of prompts that are combined to form the default prompt.
|
||||
|
||||
A default prompt might look something like:
|
||||
|
||||
```plaintext
|
||||
[-] Default
|
||||
[+] Today's date
|
||||
[+] You are an expert
|
||||
[+] Don't add comments
|
||||
```
|
||||
|
||||
Each of the above prompts can be individually expanded, and since Zed's assistant is all text, they can also be edited directly. Edits here will not propagate to the saved prompts.
|
||||
|
||||
You can add prompts to the default prompt by clicking the icon in the top right (the "sparkle" icon) of the prompt editor. This will add the prompt to the default prompt.
|
||||
|
||||
_Changes to the default prompt will not affect existing contexts. You can remove the default prompt and manually re-add it with `/default` to update an existing context._
|
||||
|
||||
Default prompts will show at the top of the prompt list, and will be included with every new context.
|
||||
|
||||
You can manually add the default prompt using the `/default` command.
|
||||
|
||||
> **Note:** Remember, commands are only evaluated when the context is created, so a command like `/now` won't continuously update, or `/file` commands won't keep their contents up to date.
|
||||
|
||||
## Commands in Prompts
|
||||
|
||||
[Commands](/assistant/commands.md) can be used in prompts to insert dynamic content or perform actions. For example, if you want to create a prompt where it is important for the model to know the date, you can use the `/now` command to insert the current date.
|
||||
|
||||
> **Note:** Slash commands in prompts **must** be on their own line.
|
||||
|
||||
See the [Commands](/assistant/commands.md) docs for more information on commands, and what slash commands are available.
|
||||
|
||||
### Example:
|
||||
|
||||
```plaintext
|
||||
You are an expert Rust engineer. The user has asked you to review their project and answer some questions.
|
||||
|
||||
Here is some information about their project:
|
||||
|
||||
/file Cargo.toml
|
||||
```
|
||||
|
||||
In the above example, the `/file` command is used to insert the contents of the `Cargo.toml` file (or all `Cargo.toml` files present in the project) into the prompt.
|
||||
|
||||
## Nesting Prompts
|
||||
|
||||
Similar to adding prompts to the default prompt, you can nest prompts within other prompts with the `/prompt` command.
|
||||
|
||||
You might want to nest prompts to:
|
||||
|
||||
- Create templates on the fly
|
||||
- Break collections like docs or references into smaller, mix-and-matchable parts
|
||||
- Create variants of a similar prompt (e.g., `Async Rust - Tokio` vs. `Async Rust - Async-std`)
|
||||
|
||||
### Example:
|
||||
|
||||
```plaintext
|
||||
Title: Zed-Flavored Rust
|
||||
|
||||
## About Zed
|
||||
|
||||
/prompt Zed: Zed (a prompt about what Zed is)
|
||||
|
||||
## Rust - Zed Style
|
||||
|
||||
/prompt Rust: Async - Async-std (zed doesn't use tokio)
|
||||
/prompt Rust: Zed-style Crates (we have some unique conventions)
|
||||
/prompt Rust - Workspace deps (bias towards reusing deps from the workspace)
|
||||
```
|
||||
|
||||
_The (text) above are comments and are not part of the prompt._
|
||||
|
||||
> **Note:** While you technically _can_ nest a prompt within itself, we wouldn't recommend it (in the strongest of terms.) Use at your own risk!
|
||||
|
||||
By using nested prompts, you can create modular and reusable prompt components that can be combined in various ways to suit different scenarios.
|
||||
|
||||
## Advanced Concepts
|
||||
|
||||
### Prompt Templates
|
||||
|
||||
Zed uses prompt templates to power internal assistant features, like the terminal assistant, or the content prompt used in the inline assistant.
|
||||
|
||||
Zed has the following internal prompt templates:
|
||||
|
||||
- `content_prompt.hbs`: Used for generating content in the editor.
|
||||
- `terminal_assistant_prompt.hbs`: Used for the terminal assistant feature.
|
||||
- `edit_workflow.hbs`: Used for generating the edit workflow prompt.
|
||||
- `step_resolution.hbs`: Used for generating the step resolution prompt.
|
||||
|
||||
At this point it is unknown if we will expand templates further to be user-creatable.
|
||||
|
||||
### Overriding Templates
|
||||
|
||||
> **Note:** It is not recommended to override templates unless you know what you are doing. Editing templates will break your assistant if done incorrectly.
|
||||
|
||||
Zed allows you to override the default prompts used for various assistant features by placing custom Handlebars (.hbs) templates in your `~/.config/zed/prompts/templates` directory.
|
||||
|
||||
The following templates can be overridden:
|
||||
|
||||
1. `content_prompt.hbs`: Used for generating content in the editor.
|
||||
Format:
|
||||
|
||||
```handlebars
|
||||
You are an AI programming assistant. Your task is to
|
||||
{{#if is_insert}}insert{{else}}rewrite{{/if}}
|
||||
{{content_type}}{{#if language_name}} in {{language_name}}{{/if}}
|
||||
based on the following context and user request. Context:
|
||||
{{#if is_truncated}}
|
||||
[Content truncated...]
|
||||
{{/if}}
|
||||
{{document_content}}
|
||||
{{#if is_truncated}}
|
||||
[Content truncated...]
|
||||
{{/if}}
|
||||
|
||||
User request:
|
||||
{{user_prompt}}
|
||||
|
||||
{{#if rewrite_section}}
|
||||
Please rewrite the section enclosed in
|
||||
<rewrite_this></rewrite_this>
|
||||
tags.
|
||||
{{else}}
|
||||
Please insert your response at the
|
||||
<insert_here></insert_here>
|
||||
tag.
|
||||
{{/if}}
|
||||
|
||||
Provide only the
|
||||
{{content_type}}
|
||||
content in your response, without any additional explanation.
|
||||
```
|
||||
|
||||
2. `terminal_assistant_prompt.hbs`: Used for the terminal assistant feature.
|
||||
Format:
|
||||
|
||||
```handlebars
|
||||
You are an AI assistant for a terminal emulator. Provide helpful responses to
|
||||
user queries about terminal commands, file systems, and general computer
|
||||
usage. System information: - Operating System:
|
||||
{{os}}
|
||||
- Architecture:
|
||||
{{arch}}
|
||||
{{#if shell}}
|
||||
- Shell:
|
||||
{{shell}}
|
||||
{{/if}}
|
||||
{{#if working_directory}}
|
||||
- Current Working Directory:
|
||||
{{working_directory}}
|
||||
{{/if}}
|
||||
|
||||
Latest terminal output:
|
||||
{{#each latest_output}}
|
||||
{{this}}
|
||||
{{/each}}
|
||||
|
||||
User query:
|
||||
{{user_prompt}}
|
||||
|
||||
Provide a clear and concise response to the user's query, considering the
|
||||
given system information and latest terminal output if relevant.
|
||||
```
|
||||
|
||||
3. `edit_workflow.hbs`: Used for generating the edit workflow prompt.
|
||||
|
||||
4. `step_resolution.hbs`: Used for generating the step resolution prompt.
|
||||
|
||||
> **Note:** Be sure you want to override these, as you'll miss out on iteration on our built-in features. This should be primarily used when developing Zed.
|
||||
|
||||
You can customize these templates to better suit your needs while maintaining the core structure and variables used by Zed. Zed will automatically reload your prompt overrides when they change on disk.
|
||||
|
||||
Consult Zed's [assets/prompts](https://github.com/zed-industries/zed/tree/main/assets/prompts) directory for current versions you can play with.
|
||||
@@ -336,7 +336,7 @@ This configuration changes the color of function names in Python files.
|
||||
|
||||
Change your theme:
|
||||
|
||||
1. Use the theme selector (Cmd+K Cmd+T on macOS, Ctrl+K Ctrl+T on Linux)
|
||||
1. Use the theme selector (<kbd>cmd-k cmd-t|ctrl-k ctrl-t</kbd>)
|
||||
2. Or set it in your `settings.json`:
|
||||
|
||||
```json
|
||||
@@ -351,7 +351,7 @@ Create custom themes by creating a JSON file in `~/.config/zed/themes/`. Zed wil
|
||||
|
||||
### Using Theme Extensions
|
||||
|
||||
Zed supports theme extensions. Browse and install theme extensions from the Extensions panel (Cmd+Shift+E).
|
||||
Zed supports theme extensions. Browse and install theme extensions from the Extensions panel (<kbd>cmd-shift-e|ctrl-shift-e</kbd>).
|
||||
|
||||
To create your own theme extension, refer to the [Developing Theme Extensions](./extensions/themes.md) guide.
|
||||
|
||||
@@ -380,16 +380,16 @@ Code actions provide quick fixes and refactoring options. Access code actions us
|
||||
|
||||
Use these commands to navigate your codebase:
|
||||
|
||||
- `editor: Go to Definition` (F12)
|
||||
- `editor: Go to Type Definition` (Cmd+F12 on macOS, Ctrl+F12 on Linux)
|
||||
- `editor: Find All References` (Shift+F12)
|
||||
- `editor: Go to Definition` (<kbd>f12|f12</kbd>)
|
||||
- `editor: Go to Type Definition` (<kbd>cmd-f12|ctrl-f12</kbd>)
|
||||
- `editor: Find All References` (<kbd>shift-f12|shift-f12</kbd>)
|
||||
|
||||
### Rename Symbol
|
||||
|
||||
To rename a symbol across your project:
|
||||
|
||||
1. Place your cursor on the symbol
|
||||
2. Use the `editor: Rename Symbol` command (F2)
|
||||
2. Use the `editor: Rename Symbol` command (<kbd>f2|f2</kbd>)
|
||||
3. Enter the new name and press Enter
|
||||
|
||||
These features depend on the capabilities of the language server for each language.
|
||||
@@ -406,7 +406,7 @@ The `workspace: Open Symbol` command allows you to search for symbols (functions
|
||||
|
||||
### Code Completion
|
||||
|
||||
Zed provides intelligent code completion suggestions as you type. You can manually trigger completion with the `editor: Show Completions` command. Use Tab or Enter to accept suggestions.
|
||||
Zed provides intelligent code completion suggestions as you type. You can manually trigger completion with the `editor: Show Completions` command. Use <kbd>tab|tab</kbd> or <kbd>enter|enter</kbd> to accept suggestions.
|
||||
|
||||
### Diagnostics
|
||||
|
||||
|
||||
@@ -13,7 +13,7 @@ Consider renaming `zed: Open Local Settings` to `zed: Open Project Settings`.
|
||||
TBD: Add settings documentation about how settings are merged as overlays. E.g. project>local>default. Note how settings that are maps are merged, but settings that are arrays are replaced and must include the defaults.
|
||||
-->
|
||||
|
||||
Your settings file can be opened with `cmd-,` (on macOS) or `ctrl-,` (on Linux). By default it is located at `~/.config/zed/settings.json`, though if you have XDG_CONFIG_HOME in your environment on Linux it will be at `$XDG_CONFIG_HOME/zed/settings.json` instead.
|
||||
Your settings file can be opened with <kbd>cmd-,|ctrl-,</kbd>. By default it is located at `~/.config/zed/settings.json`, though if you have XDG_CONFIG_HOME in your environment on Linux it will be at `$XDG_CONFIG_HOME/zed/settings.json` instead.
|
||||
|
||||
This configuration is merged with any local configuration inside your projects. You can open the project settings by running `zed: Open Local Settings` from the command palette. This will create a `.zed` directory containing`.zed/settings.json`.
|
||||
|
||||
|
||||
@@ -79,7 +79,7 @@ Thank you for taking on the task of packaging Zed!
|
||||
|
||||
Zed has two main binaries:
|
||||
|
||||
- You will need to build `crates/cli` and make it's binary available in `$PATH` with the name `zed`.
|
||||
- You will need to build `crates/cli` and make its binary available in `$PATH` with the name `zed`.
|
||||
- You will need to build `crates/zed` and put it at `$PATH/to/cli/../../libexec/zed-editor`. For example, if you are going to put the cli at `~/.local/bin/zed` put zed at `~/.local/libexec/zed-editor`. As some linux distributions (notably Arch) discourage the use of `libexec`, you can also put this binary at `$PATH/to/cli/../../lib/zed/zed-editor` (e.g. `~/.local/lib/zed/zed-editor`) instead.
|
||||
- If you are going to provide a `.desktop` file you can find a template in `crates/zed/resources/zed.desktop.in`, and use `envsubst` to populate it with the values required. This file should also be renamed to `$APP_ID.desktop` so that the file [follows the FreeDesktop standards](https://github.com/zed-industries/zed/issues/12707#issuecomment-2168742761).
|
||||
- You will need to ensure that the necessary libraries are installed. You can get the current list by [inspecting the built binary](https://github.com/zed-industries/zed/blob/059a4141b756cf4afac4c977afc488539aec6470/script/bundle-linux#L65-L70) on your system.
|
||||
|
||||
@@ -42,9 +42,7 @@ If this script is insufficient for your use case or you run into problems runnin
|
||||
|
||||
The Command Palette is the main way to access functionality in Zed, and its keybinding is the first one you should make yourself familiar with.
|
||||
|
||||
On macOS, use `⌘-P` (`cmd-shift-p`) to open the Command Palette.
|
||||
|
||||
On Linux, use `⌃-P` (`ctrl-shift-p`) to open the Command Palette.
|
||||
To open the Command Palette, use <kbd>cmd-shift-p|ctrl-shift-p</kbd>.
|
||||
|
||||
The Command Palette allows you to access pretty much any functionality that's available in Zed.
|
||||
|
||||
@@ -56,14 +54,14 @@ Any time you see instructions that include commands of the form `zed: ...` or `e
|
||||
|
||||
## Configure Zed
|
||||
|
||||
Use `⌘` + `,`, or `ctrl` - `,` to open your custom settings to set things like fonts, formatting settings, per-language settings, and more.
|
||||
Use <kbd>cmd-,|ctrl-,</kbd> to open your custom settings to set things like fonts, formatting settings, per-language settings, and more.
|
||||
|
||||
On macOS, you can access the default configuration using the `Zed > Settings > Open Default Settings` menu item. See [Configuring Zed](./configuring-zed.md) for all available settings.
|
||||
|
||||
On Linux, you can access the default configuration via the Command Palette. Open it with `ctrl-shift-p` and type in `zed: open default settings` and then hit return.
|
||||
On Linux, you can access the default configuration via the Command Palette. Open it with <kbd>ctrl-shift-p</kbd> and type in `zed: open default settings` and then hit return.
|
||||
|
||||
## Set up your key bindings
|
||||
|
||||
On macOS, you can access the default key binding set using the `Zed > Settings > Open Default Key Bindings` menu item. Use `⌘` + `K`, `⌘` + `S` to open your custom keymap to add your key bindings. See Key Bindings for more info.
|
||||
On macOS, you can access the default key binding set using the `Zed > Settings > Open Default Key Bindings` menu item. Use <kbd>cmd-k cmd-s|ctrl-k ctrl-s</kbd> to open your custom keymap to add your key bindings. See Key Bindings for more info.
|
||||
|
||||
On Linux, you can access the default key bindings via the Command Palette. Open it with `ctrl-shift-p` and type in `zed: open default keymap` and then hit return.
|
||||
On Linux, you can access the default key bindings via the Command Palette. Open it with <kbd>ctrl-shift-p</kbd> and type in `zed: open default keymap` and then hit return.
|
||||
|
||||
@@ -94,7 +94,7 @@ The same task modal opened via `task: spawn` supports arbitrary bash-like comman
|
||||
|
||||
Task modal will persist list of those command for current Zed session, `task: rerun` will also rerun such tasks if they were the last ones spawned.
|
||||
|
||||
You can also adjust currently selected task in a modal (`tab` is a default key binding). Doing so will put it's command into a prompt that can then be edited & spawned as an oneshot task.
|
||||
You can also adjust currently selected task in a modal (`tab` is a default key binding). Doing so will put its command into a prompt that can then be edited & spawned as an oneshot task.
|
||||
|
||||
### Ephemeral tasks
|
||||
|
||||
|
||||
4
docs/theme/index.hbs
vendored
4
docs/theme/index.hbs
vendored
@@ -23,6 +23,7 @@
|
||||
<link rel="stylesheet" href="{{ path_to_root }}css/variables.css">
|
||||
<link rel="stylesheet" href="{{ path_to_root }}css/general.css">
|
||||
<link rel="stylesheet" href="{{ path_to_root }}css/chrome.css">
|
||||
<link rel="stylesheet" href="{{ path_to_root }}plugins.css">
|
||||
{{#if print_enable}}
|
||||
<link rel="stylesheet" href="{{ path_to_root }}css/print.css" media="print">
|
||||
{{/if}}
|
||||
@@ -251,9 +252,10 @@
|
||||
<script src="{{ path_to_root }}highlight.js"></script>
|
||||
<script src="{{ path_to_root }}book.js"></script>
|
||||
|
||||
<!-- Custom JS scripts -->
|
||||
<!-- Custom JS scripts -->
|
||||
{{#each additional_js}}
|
||||
<script src="{{ ../path_to_root }}{{this}}"></script>
|
||||
<script src="{{ path_to_root }}plugins.js"></script>
|
||||
{{/each}}
|
||||
|
||||
{{#if is_print}}
|
||||
|
||||
8
docs/theme/plugins.css
vendored
Normal file
8
docs/theme/plugins.css
vendored
Normal file
@@ -0,0 +1,8 @@
|
||||
kbd.keybinding {
|
||||
background-color: #f0f0f0;
|
||||
padding: 2px 4px;
|
||||
border-radius: 3px;
|
||||
font-family: monospace;
|
||||
display: inline-block;
|
||||
margin: 0 2px;
|
||||
}
|
||||
50
docs/theme/plugins.js
vendored
Normal file
50
docs/theme/plugins.js
vendored
Normal file
@@ -0,0 +1,50 @@
|
||||
function detectOS() {
|
||||
var userAgent = navigator.userAgent;
|
||||
|
||||
var platform = navigator.platform;
|
||||
var macosPlatforms = ["Macintosh", "MacIntel", "MacPPC", "Mac68K"];
|
||||
var windowsPlatforms = ["Win32", "Win64", "Windows", "WinCE"];
|
||||
var iosPlatforms = ["iPhone", "iPad", "iPod"];
|
||||
|
||||
if (macosPlatforms.indexOf(platform) !== -1) {
|
||||
return "Mac";
|
||||
} else if (iosPlatforms.indexOf(platform) !== -1) {
|
||||
return "iOS";
|
||||
} else if (windowsPlatforms.indexOf(platform) !== -1) {
|
||||
return "Windows";
|
||||
} else if (/Android/.test(userAgent)) {
|
||||
return "Android";
|
||||
} else if (/Linux/.test(platform)) {
|
||||
return "Linux";
|
||||
}
|
||||
|
||||
return "Unknown";
|
||||
}
|
||||
|
||||
// Usage
|
||||
var os = detectOS();
|
||||
console.log("Operating System:", os);
|
||||
|
||||
(function updateKeybindings() {
|
||||
const os = detectOS();
|
||||
const isMac = os === "Mac" || os === "iOS";
|
||||
|
||||
function processKeybinding(element) {
|
||||
const [macKeybinding, linuxKeybinding] = element.textContent.split("|");
|
||||
element.textContent = isMac ? macKeybinding : linuxKeybinding;
|
||||
element.classList.add("keybinding");
|
||||
}
|
||||
|
||||
function walkDOM(node) {
|
||||
if (node.nodeType === Node.ELEMENT_NODE) {
|
||||
if (node.tagName.toLowerCase() === "kbd") {
|
||||
processKeybinding(node);
|
||||
} else {
|
||||
Array.from(node.children).forEach(walkDOM);
|
||||
}
|
||||
}
|
||||
}
|
||||
|
||||
// Start the process from the body
|
||||
walkDOM(document.body);
|
||||
})();
|
||||
@@ -1,6 +1,6 @@
|
||||
[package]
|
||||
name = "zed_elixir"
|
||||
version = "0.0.7"
|
||||
version = "0.0.8"
|
||||
edition = "2021"
|
||||
publish = false
|
||||
license = "Apache-2.0"
|
||||
|
||||
@@ -1,7 +1,7 @@
|
||||
id = "elixir"
|
||||
name = "Elixir"
|
||||
description = "Elixir support."
|
||||
version = "0.0.7"
|
||||
version = "0.0.8"
|
||||
schema_version = 1
|
||||
authors = ["Marshall Bowers <elliott.codes@gmail.com>"]
|
||||
repository = "https://github.com/zed-industries/zed"
|
||||
|
||||
Reference in New Issue
Block a user